 | 3.3. Making policy – step by step | |
|---|---|---|
| ↢ | Chapter 3. Making Policy Decisions | ↣ |
How often have you walked away from a meeting frustrated about how the meeting time was spent? How can we avoid this?
We want readers to understand all steps so everyone knows the milestones, tools and measures and can make intentional choices. Before discussing decision making, we have to understand some basic sociocratic concepts that measurement-driven process builds on: lead–do–measure and input–transformation–output. While guiding the process is primarily the facilitator’s task, co-creative process depends on good “followers” as much as on good facilitators. The more members of the circle are familiar with measurement-driven process, the smoother processes will be.
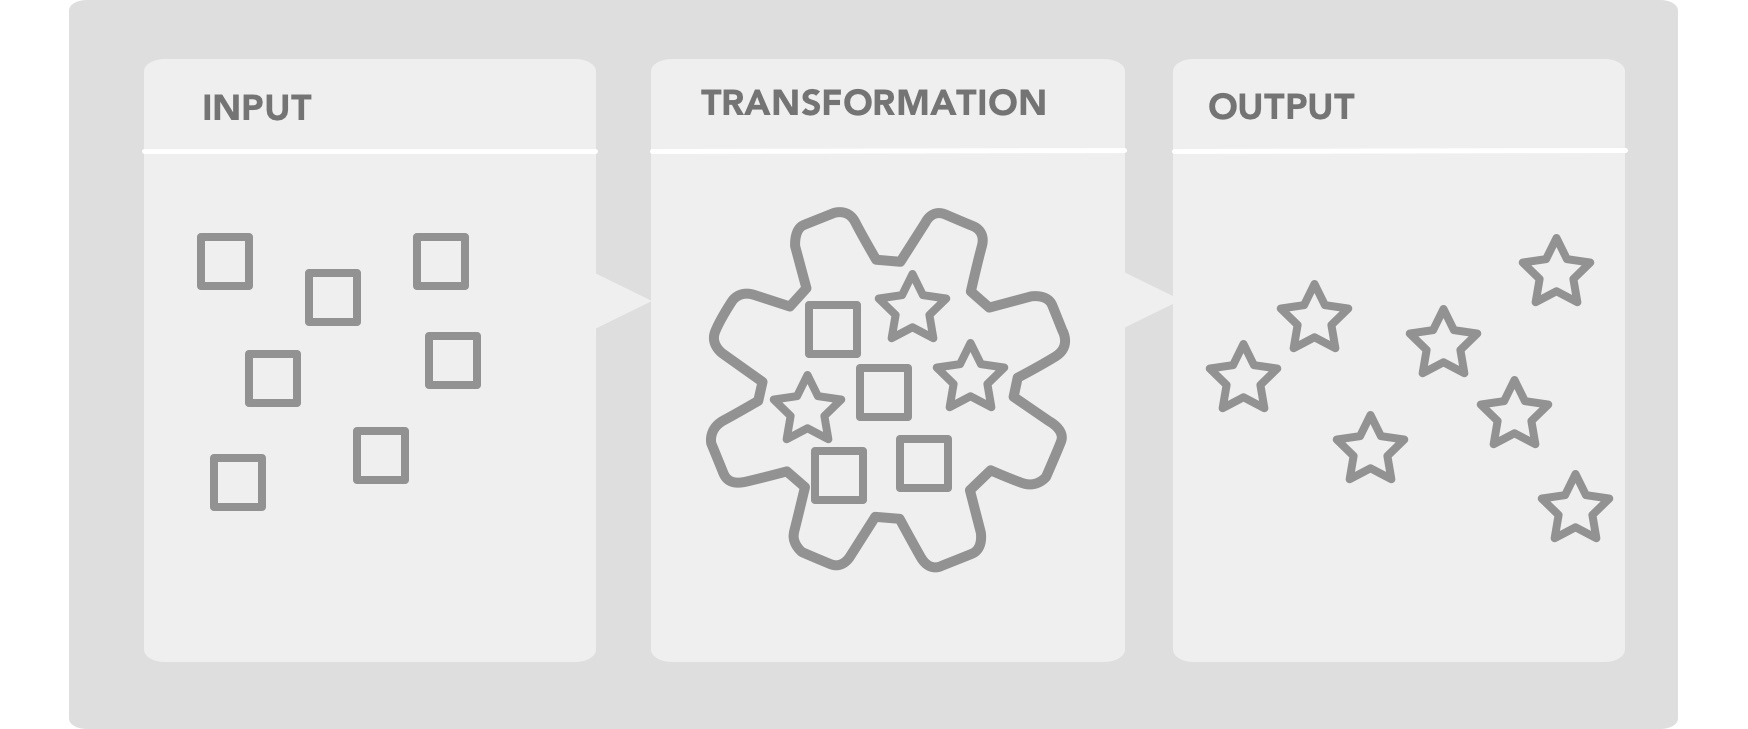
Every process consists of three phases: input, transformation and output. Input is what we know, think, or have when we start. Transformation is whatever we do to that input. Output is what we get out of the transformation process. The kind of output depends on the task at hand:
If our task is to cook a meal, then the input is the ingredients for the meal. The transformation is the cooking of the meal. The output is the serving of the meal.
If our task at hand is making stars out of squares using a machine like in figure Figure 3.7, “Input – transformation – output”, then squares are our input, transformation is whatever the magic machine does, and our output is stars.
If our input is agenda items, then meetings transform them into decisions.
Figure 3.7. Input – transformation – output
 |
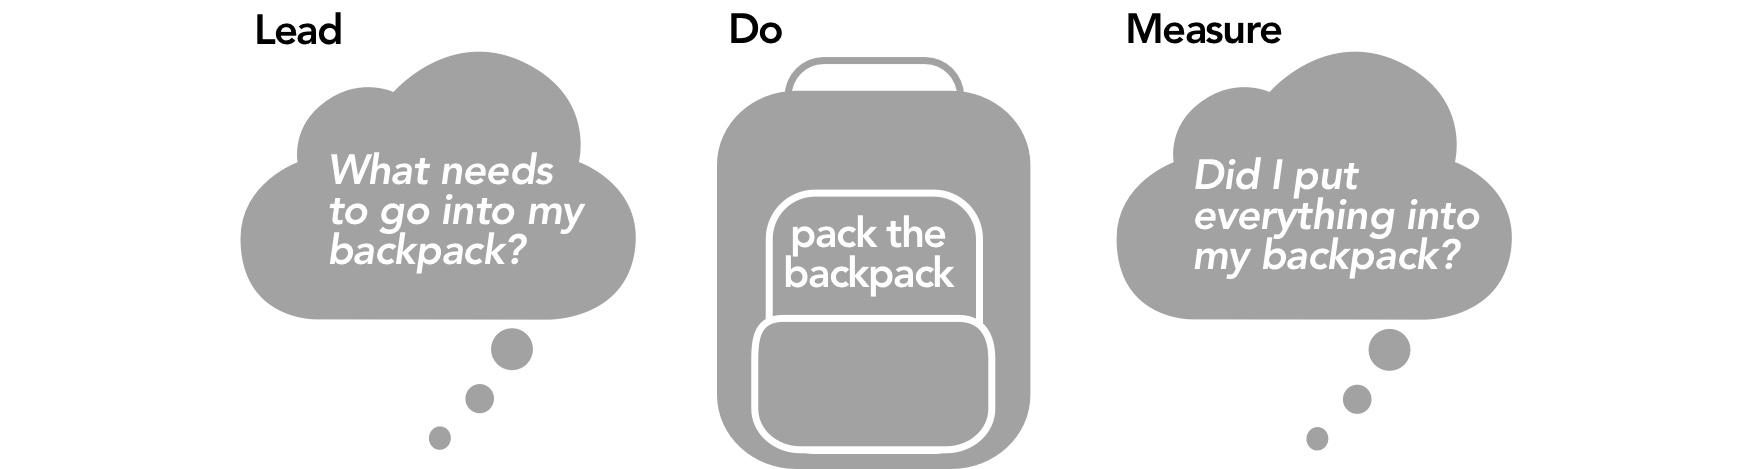
Every step along the way, we want to be sure we’re being intentional and successful. For example, if we pack a backpack for the day, we might think about what we need to bring first. Then we pack, and finally, we might review to check whether we packed everything we need. Every step in decision making and workflow involves three steps: lead – do – measure.
Figure 3.8. Lead – do – measure when packing a backpack
 |
The doing is where our focus is most of the time; however, both the leading phase and the measuring phase are vitally important. We will not use our time and resources efficiently if we fail to slow down and plan before we act. Equally, if we forget to measure whether what we are doing is reaching the desired results, we do not notice early enough if we get off track.
Figure 3.9. Lead – do – measure
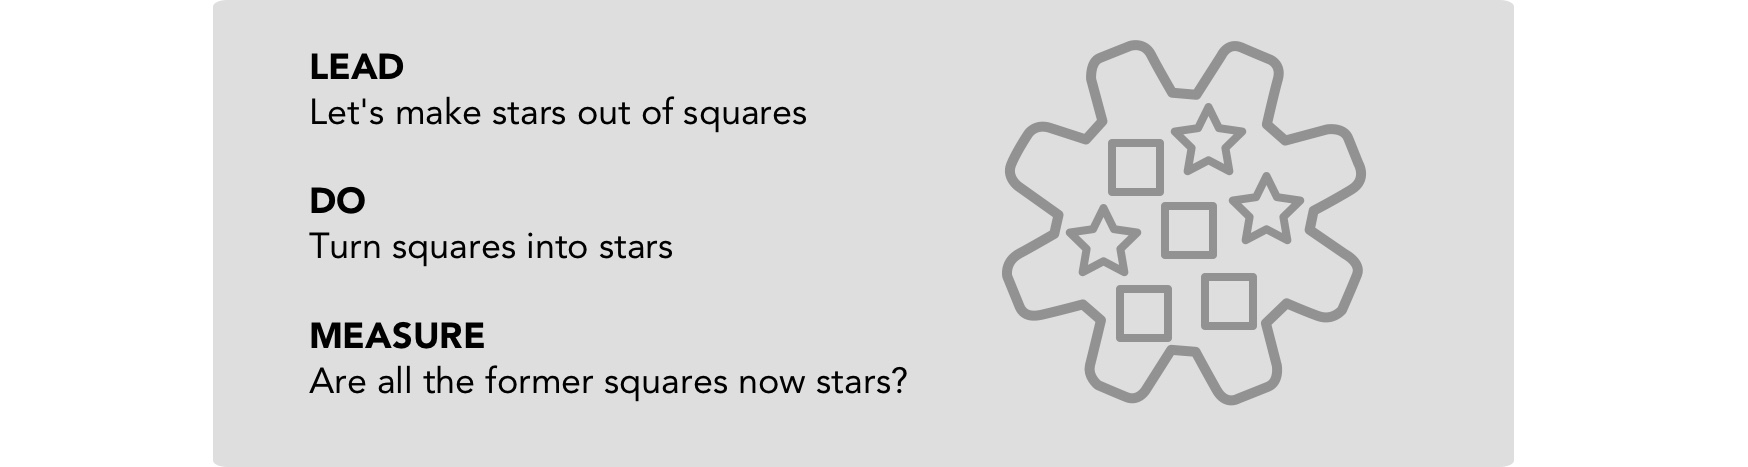 |
Let’s assume we want to turn squares into stars using a magic machine like in figure Figure 3.9, “Lead – do – measure”. We would make a plan (lead), perform the action (do) and then check whether we reached the desired outcome (measure). As lead – do – measure is a standard mindset in sociocracy, it is applied in countless situations, and we will see more examples related to workflow and decision making.
We can apply lead – do – measure cycles to every individual step of input -- transformation -- output. Every smaller step along the way, we plan that step, do it, and then evaluate whether we have completed the step before we move to the next step.
The diagram in Figure 3.10, “Input – transformation – output with lead – do – measure” shows the steps of lead – do – measure in the context of our star-making machine.
Figure 3.10. Input – transformation – output with lead – do – measure
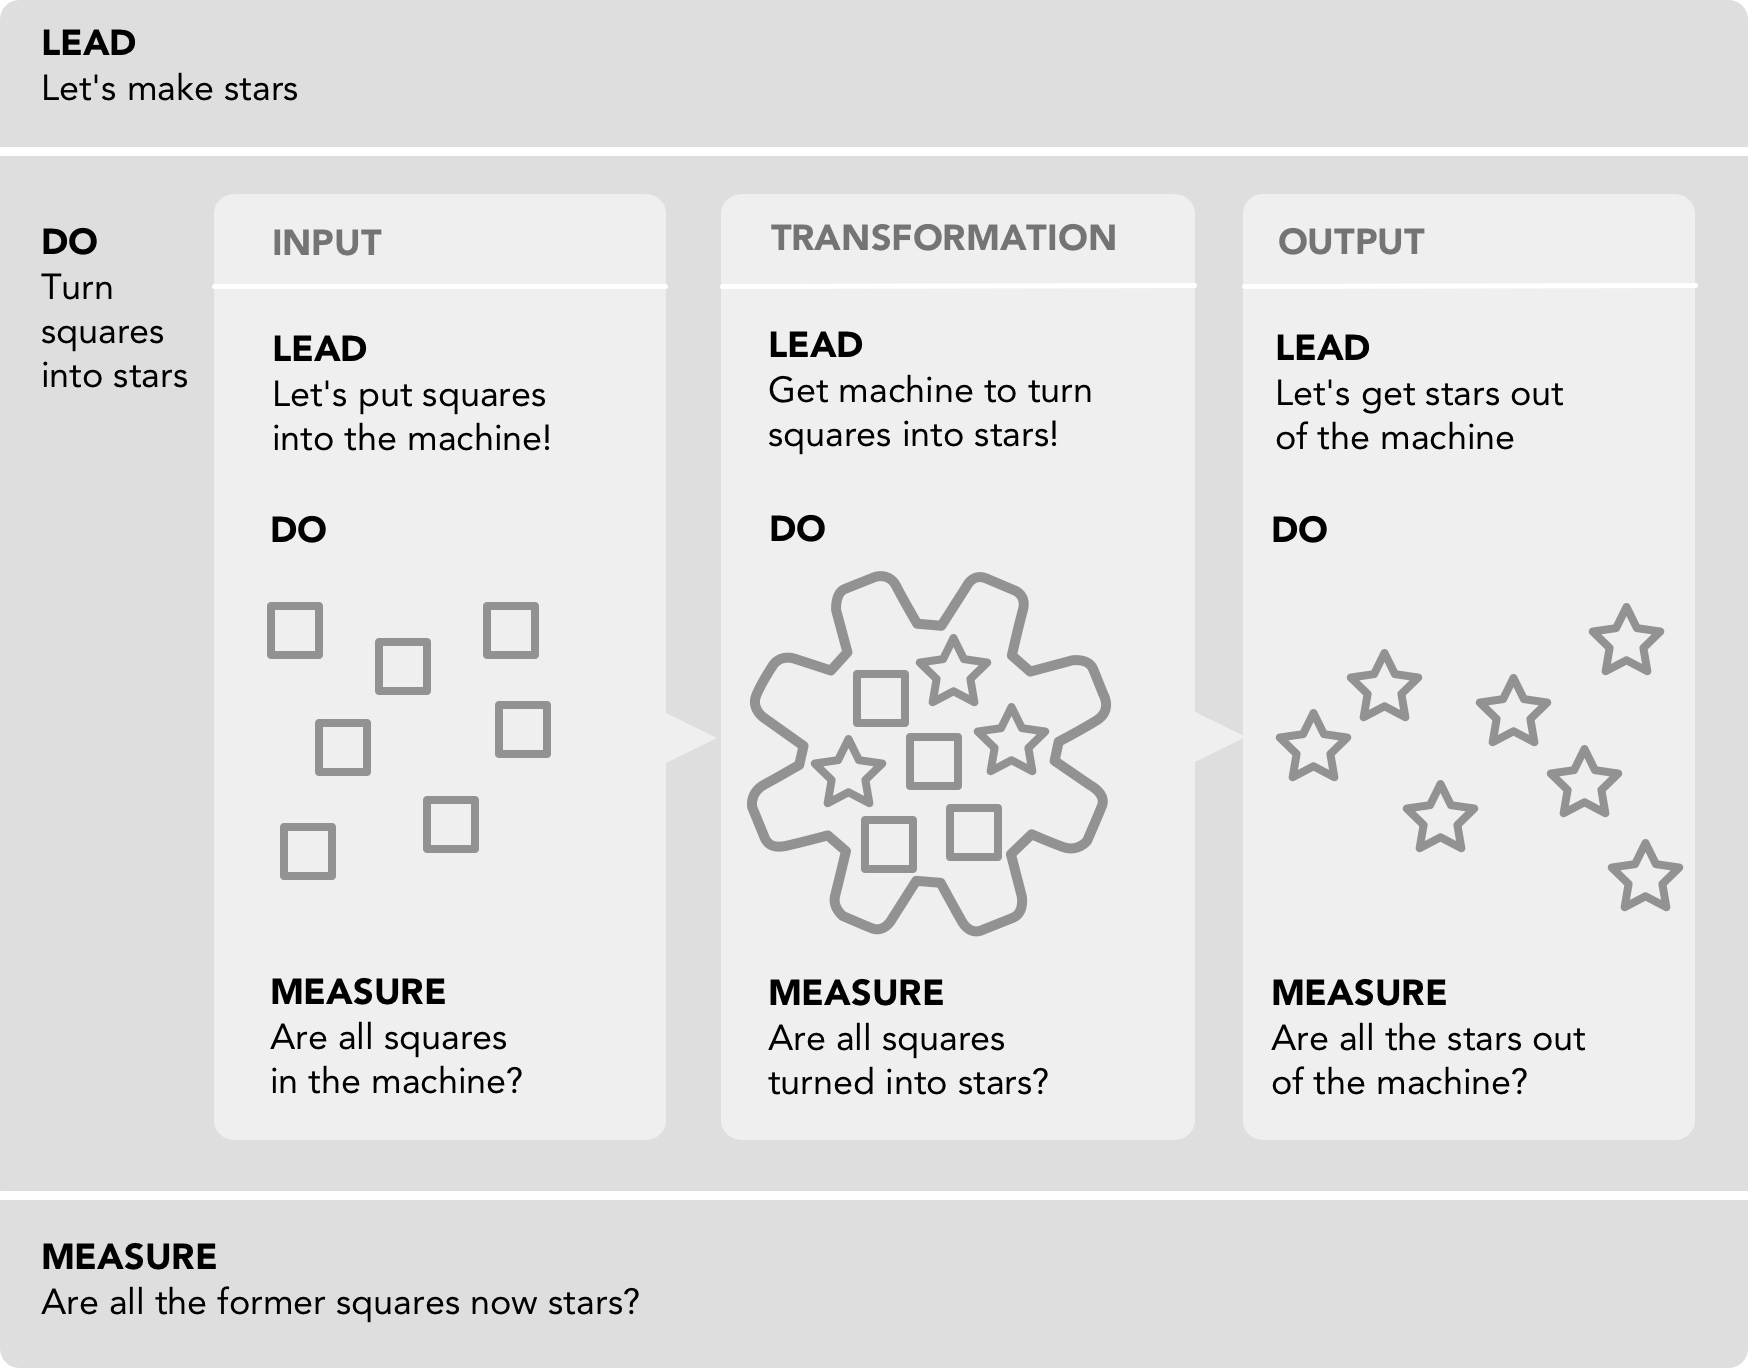 |
We make a plan for the input, perform the necessary action (filling the machine), and make sure we completed the input phase. We make a plan for the transformation stage, perform the transformation and measure whether we have completed the phase. We make a plan for the output phase, perform the necessary action and measure whether we have completed the output.
Figure 3.11. Cooking a meal
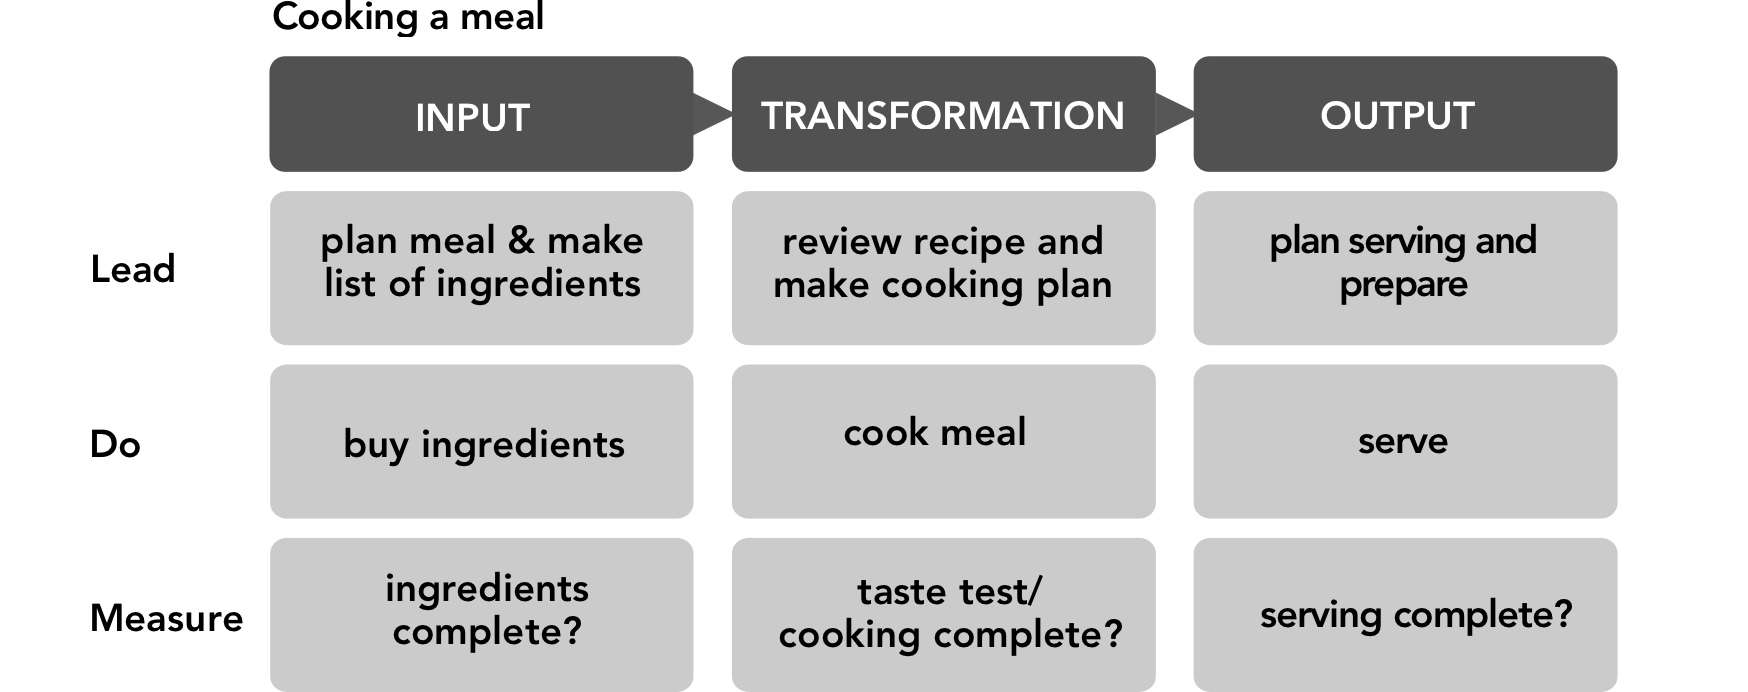 |
Back to the example of cooking a meal, the same pattern applies. Let’s say we are cooking for a large number of people. The day before, we might make a list of ingredients based on a recipe and buy those ingredients. The day of the cooking event, we double-check whether all ingredients are there. Then we look at the recipe again and plan what order to do the steps in and how long it might take. Now we cook the ingredients into a meal. After we have completed all the steps, we look at the food and wonder whether it is done now. We check the consistency, taste and temperature to prepare for the output. Then we plan the serving. Bowls or deep plates? Any decoration? We now serve the food and for a second, our eyes wander around, checking whether all is complete as the meal is about to begin.
These are steps that we go through naturally. The need to define the steps explicitly is higher if the process consists of more parts, for example, if the person/group who buys the ingredients is different from the group that cooks and different from the servers, or if we need to order wholesale food in large quantities with an entire workflow instead of a simple shopping trip. We need to have a clean process in place or there will be friction in the workflow.
For decision making, a group has to think together. All minds have to be connected and synchronized, while allowing for creativity and people’s own way of thinking. There are a lot of different layers playing together on top of the content of our decision: process, interpersonal issues, internalized patterns, personal style, performance issues (distractions etc.). The more people participate, the more things happen simultaneously. Shared exploration and decision making is a complicated and complex endeavor. A good and clear system will help.
We divide the decision-making process into manageable chunks and linearize them so they can be completed together. We want to avoid situations like these:
One person is still grappling with a detail in wording while the others are ready to explore options. Some get impatient, and the one person feels pressured into letting go their need for clarity.
Or: half of the group is still wanting to explore options and the other half is ready to decide. Both groups get frustrated.
Or: a decision is made but soon after, it becomes obvious that not everyone was clear on what the decision was.
We labeled the main chunks of the work-flow process in the star-making machine as input – transformation – output. To make this process easier to understand as it applies to decision making, we will label it understand – explore – decide. The decide step does not have to be a policy decision – it can simply be a conclusion reached at the end of a discussion – the synthesis.
Figure 3.12. We refer to input – transformation – output as understand – explore – synthesize in certain phases of decision making.
 |
Understand: the input step is to understand what needs to be understood. What information do we have and how do we interpret it? What needs are there to consider?
Explore: the explore phase is when we consider wider input, gather ideas etc. This is the generative phase of group processes.
Decide: the decide phase is where we make sure we have a result from our process. A decision does not have to be a final decision – it can just be synthesis that we agree on, for example, a statement describing an issue or a co-created list that serves as input for the next phase.
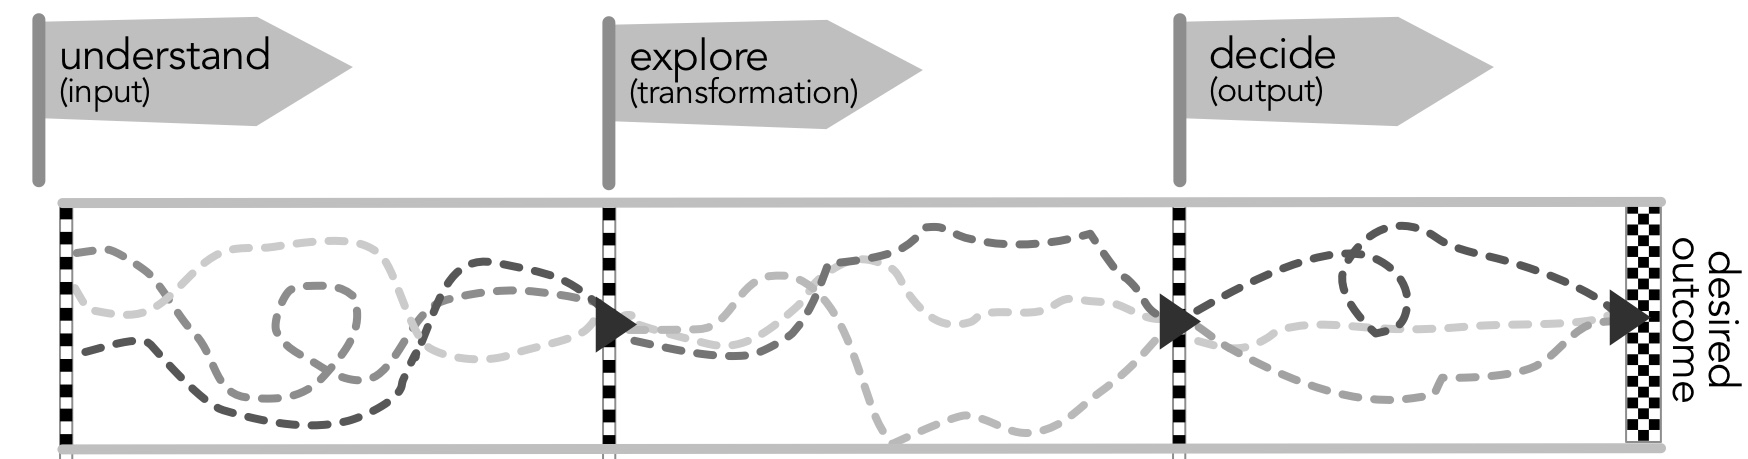
Figure Figure 3.13, “Understand -- explore -- decide in decision making as a team: we have our own ways but we finish together” shows how individuals can move as a group safely through all those steps with a sense of flow: being on the same page and working more or less at the same pace. Everyone might be running in different directions – some might be linear thinkers, some of us have minds that go in little loops, and some of us pay attention to things that tend to go unnoticed. That’s ok. The important thing is that for every milestone (1) we start out together and (2) we finish together. We can make good progress following a broad roadmap like in Figure 3.13, “Understand -- explore -- decide in decision making as a team: we have our own ways but we finish together”.
Figure 3.13. Understand -- explore -- decide in decision making as a team: we have our own ways but we finish together
 |
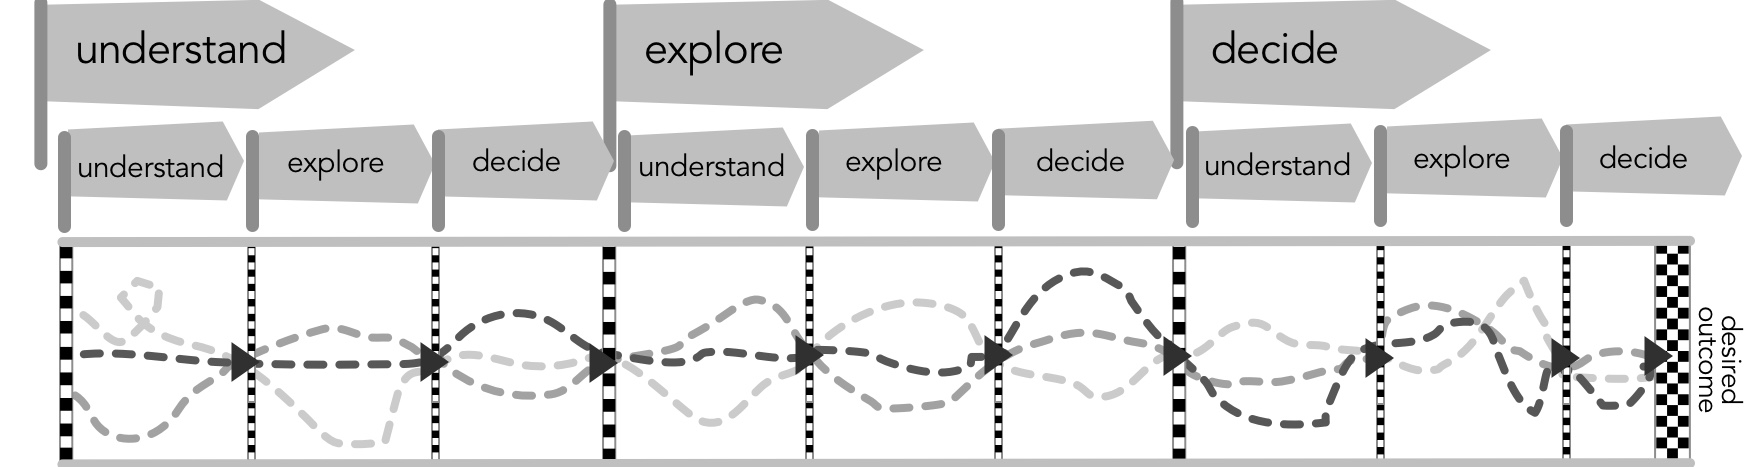
All the steps in decision making fall into smaller steps, like fractals: as soon as we zoom in with a magnifying glass onto one phase, we find understand – explore – decide again. The more in-between steps we consider, the more intentional and effective we can be. The fractal nature is shown in figure Figure 3.14, “The steps fall into more fine-grained steps, like fractals”. Each step now correlates to (a set of) rounds (people in the circle speaking in turn) – which makes facilitation in this format very simple. With many small rounds, each with a well-defined question and scope, every circle member can focus on the content at hand.
Figure 3.14. The steps fall into more fine-grained steps, like fractals
 |
The default tool for an understand phase is a combination of report/clarifying questions round.
The default tool for an explore phase is a generative (reaction) round.
The default tool for a decide phase is a consent round.
However, the same milestone can be reached in different ways. Groups can do what is effective in their situation. For example, if the aim is to understand, we can do a round where every circle member asks their question or ask people to raise their hand in case they have a question. Both approaches will get us there. For any of the milestones, we are free to brainstorm, delegate to one person, survey, dance, sing or act something out; we just want to be aware of our desired outcome.
As shown in Fig. Figure 3.15, “Every step has its own lead – do – measure loop”, each phase is wrapped into lead – do – measure cycles. Measures like “Does everyone understand the issue? Have we heard everyone’s ideas? Is everyone ready to move to the next step?” tell us whether we have reached a milestone.
Figure 3.15. Every step has its own lead – do – measure loop
 |
In this book, we will refer to the entire process of making policy decisions as ‘‘policy process’’, while the last phase (consenting to a proposal) is called ‘‘consent process’’. For every step, we are giving the intention (lead), the tools (do/path) and the measure for telling when a step is complete (complete when). In the following sections, we will go through every phase with lots of detail. The detail is intended to support groups in gaining clarity and choice, not to be prescriptive.
Please note that we see the processes described here, based on the classic steps of input – transformation – output, are compatible with ‘‘classic’’ sociocracy and with different flavors of sociocracy, for example, Sociocracy 3.0). There are many ways to use and name the process. The contribution in this manual is in listing and explaining the intention, tools and measures explicitly. If groups deviate in nomenclature or in what tools they prefer, we want to make sure the process integrates equivalence and effectiveness. Especially if groups deviate from what the international community has found to be useful practice over time, we recommend stepping back from time to time and reviewing whether the tweaked process is delivering what is desired.
Figure 3.16. Understand – explore – decide
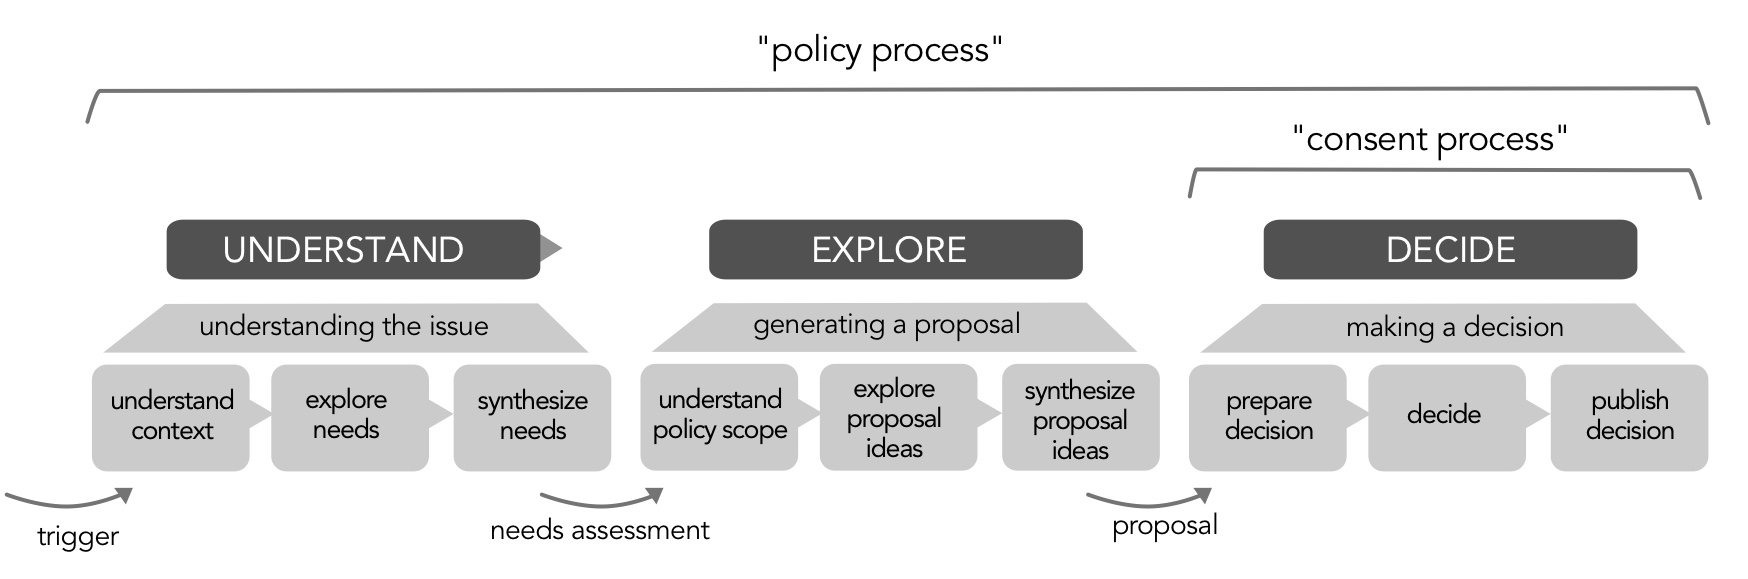 |
We start the policy process by understanding the issue that lies under the trigger that brought a topic to our circle. That trigger could be a complaint, or an accident, a drop in sales, or the desire to achieve more. A trigger event points to a deeper need. Before strategizing how to better meet the underlying need effectively, everyone needs to understand it. It can get frustrating when, half-way into the policy generation process, we realize we still do not have clarity about the context, trigger or need. The understanding phase ends with a written or verbally stated “needs statement” that summarizes how the circle understands the issue and needs on the table. The three-step process here is to:
Understand the trigger and the underlying issue.
Explore the underlying needs.
Synthesize the issue and underlying needs.
Figure 3.17. The understand phase
 |
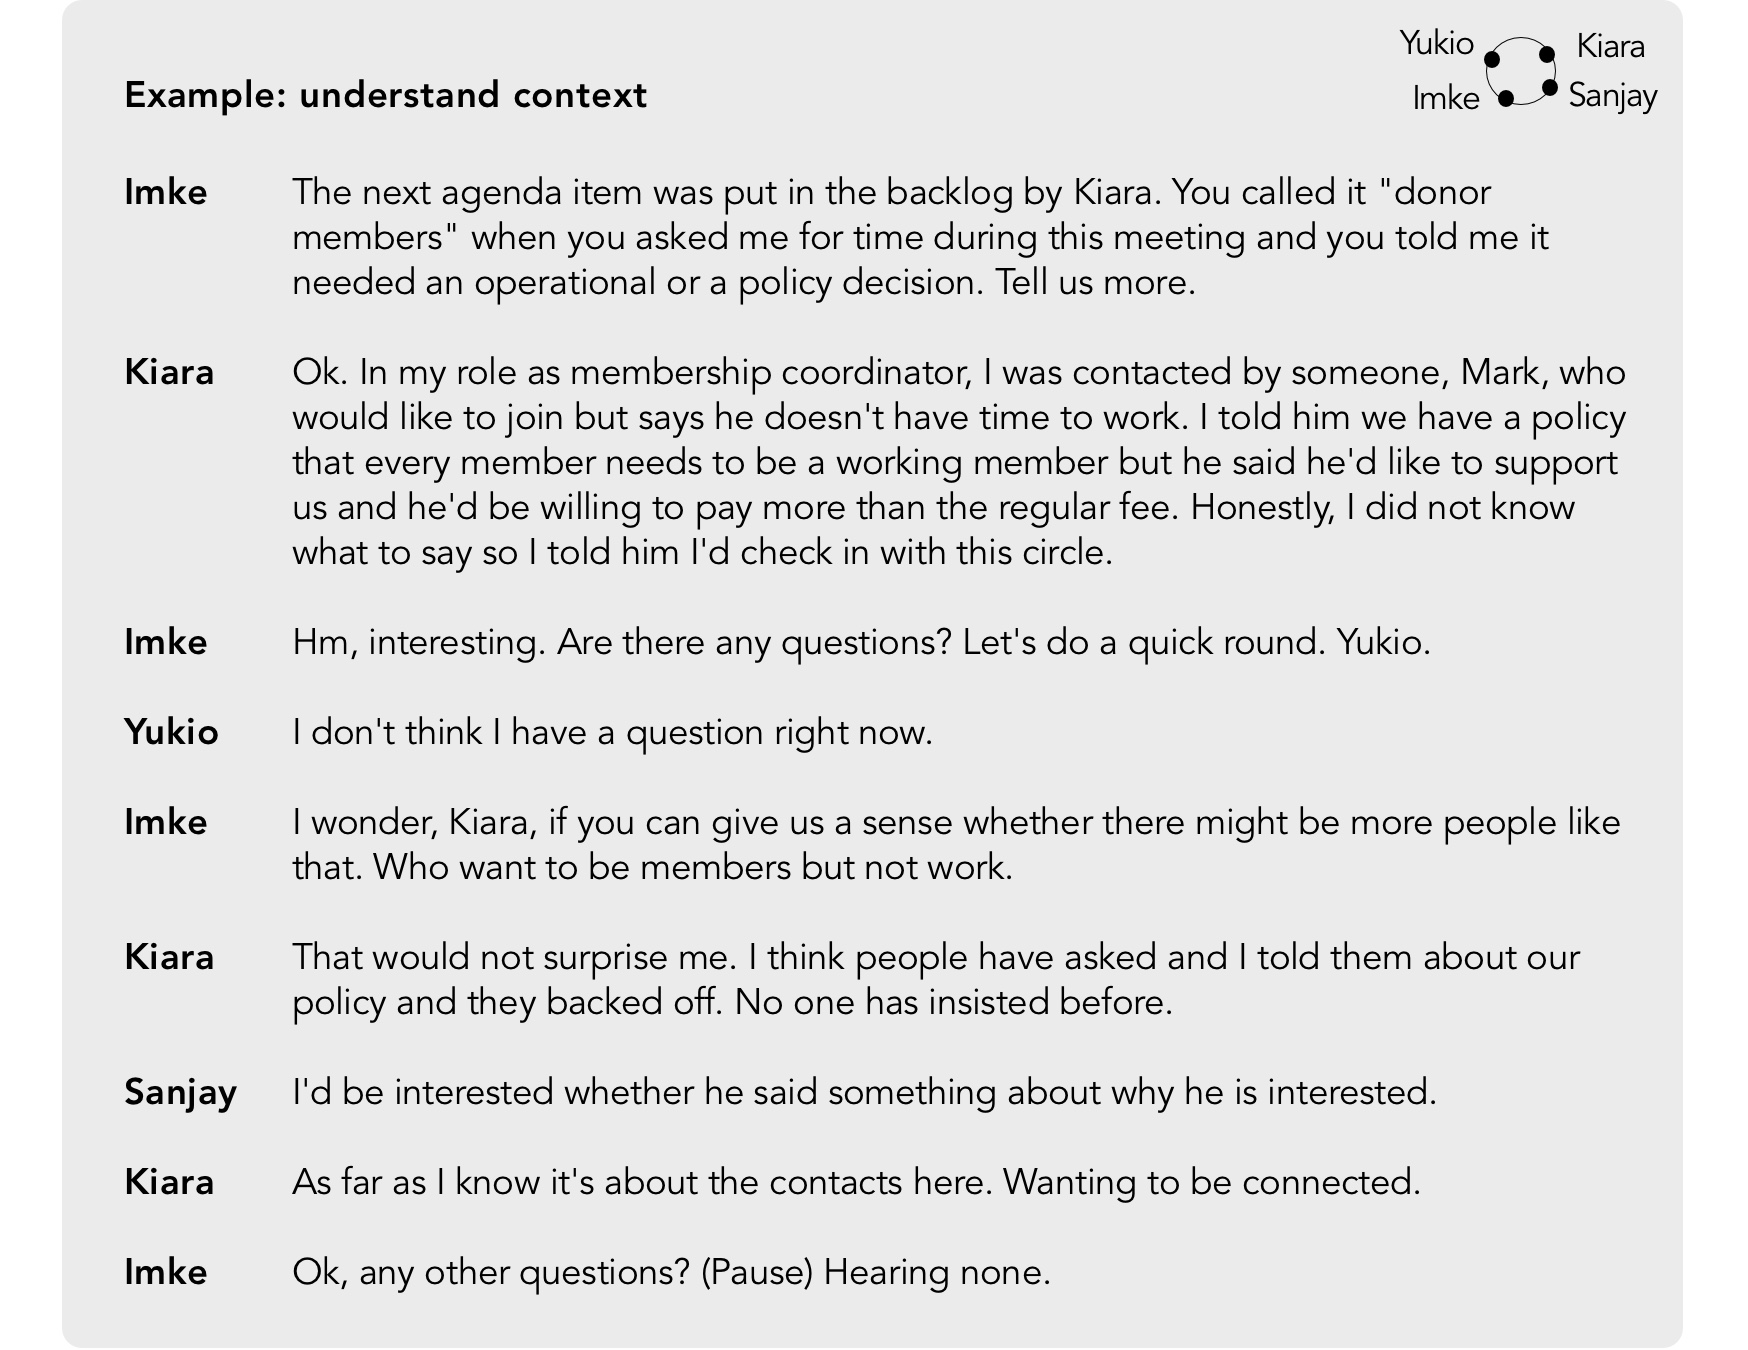
An issue comes to the circle. At the very beginning, before we do anything else, we give the circle members some context. How did this topic get on the agenda? Then we describe the trigger that has prompted the topic to come to the awareness of the group.
Intention: Everyone understands the issue.
Tools: Make sure all information on context and issue is complete.
Invite reports from all affected or involved (incl. written material).
Ask and answer questions (clarifying questions round or open questions).
Complete when: No one has any more questions about the context or trigger.
Example Figure 3.18, “Understand: understand context” shows what this could sound like. Note that in this example, the facilitator chooses not to call for a full round and just asks whether anyone has questions. This works well in easy cases. Alternatively, we can call for a clarifying questions round (see section Section 5.5.2.1, “Clarifying questions rounds”). We answer all the questions one by one, or we gather questions first and answer them after – whatever seems easiest.
Figure 3.18. Understand: understand context
 |
Shift the attention from the concrete incident to a more general view. Triggers and people’s responses are data pointing to underlying needs. In a collective effort to make sense of what we observe, we want to understand the underlying needs so we can find effective strategies.
Intention: Exploring what needs are underlying the issue.
Tools: Invite all circle members’ interpretations.
A good prompt is “what do you think this is really about for everyone involved?”
A round where people offer their interpretation or guess needs (needs list p. Figure A.4, “Meeting sheet for facilitators”).
Write down keywords of what is being said in a way that is visible to everyone.
Remember to consider all stakeholders. This could be the circle, members, non-members, or the planet. We can have members stand in for others or find other ways to support so everyone’s needs can be considered.
Complete when: No one has more ideas to add.
Figure 3.19. Understand: explore underlying needs
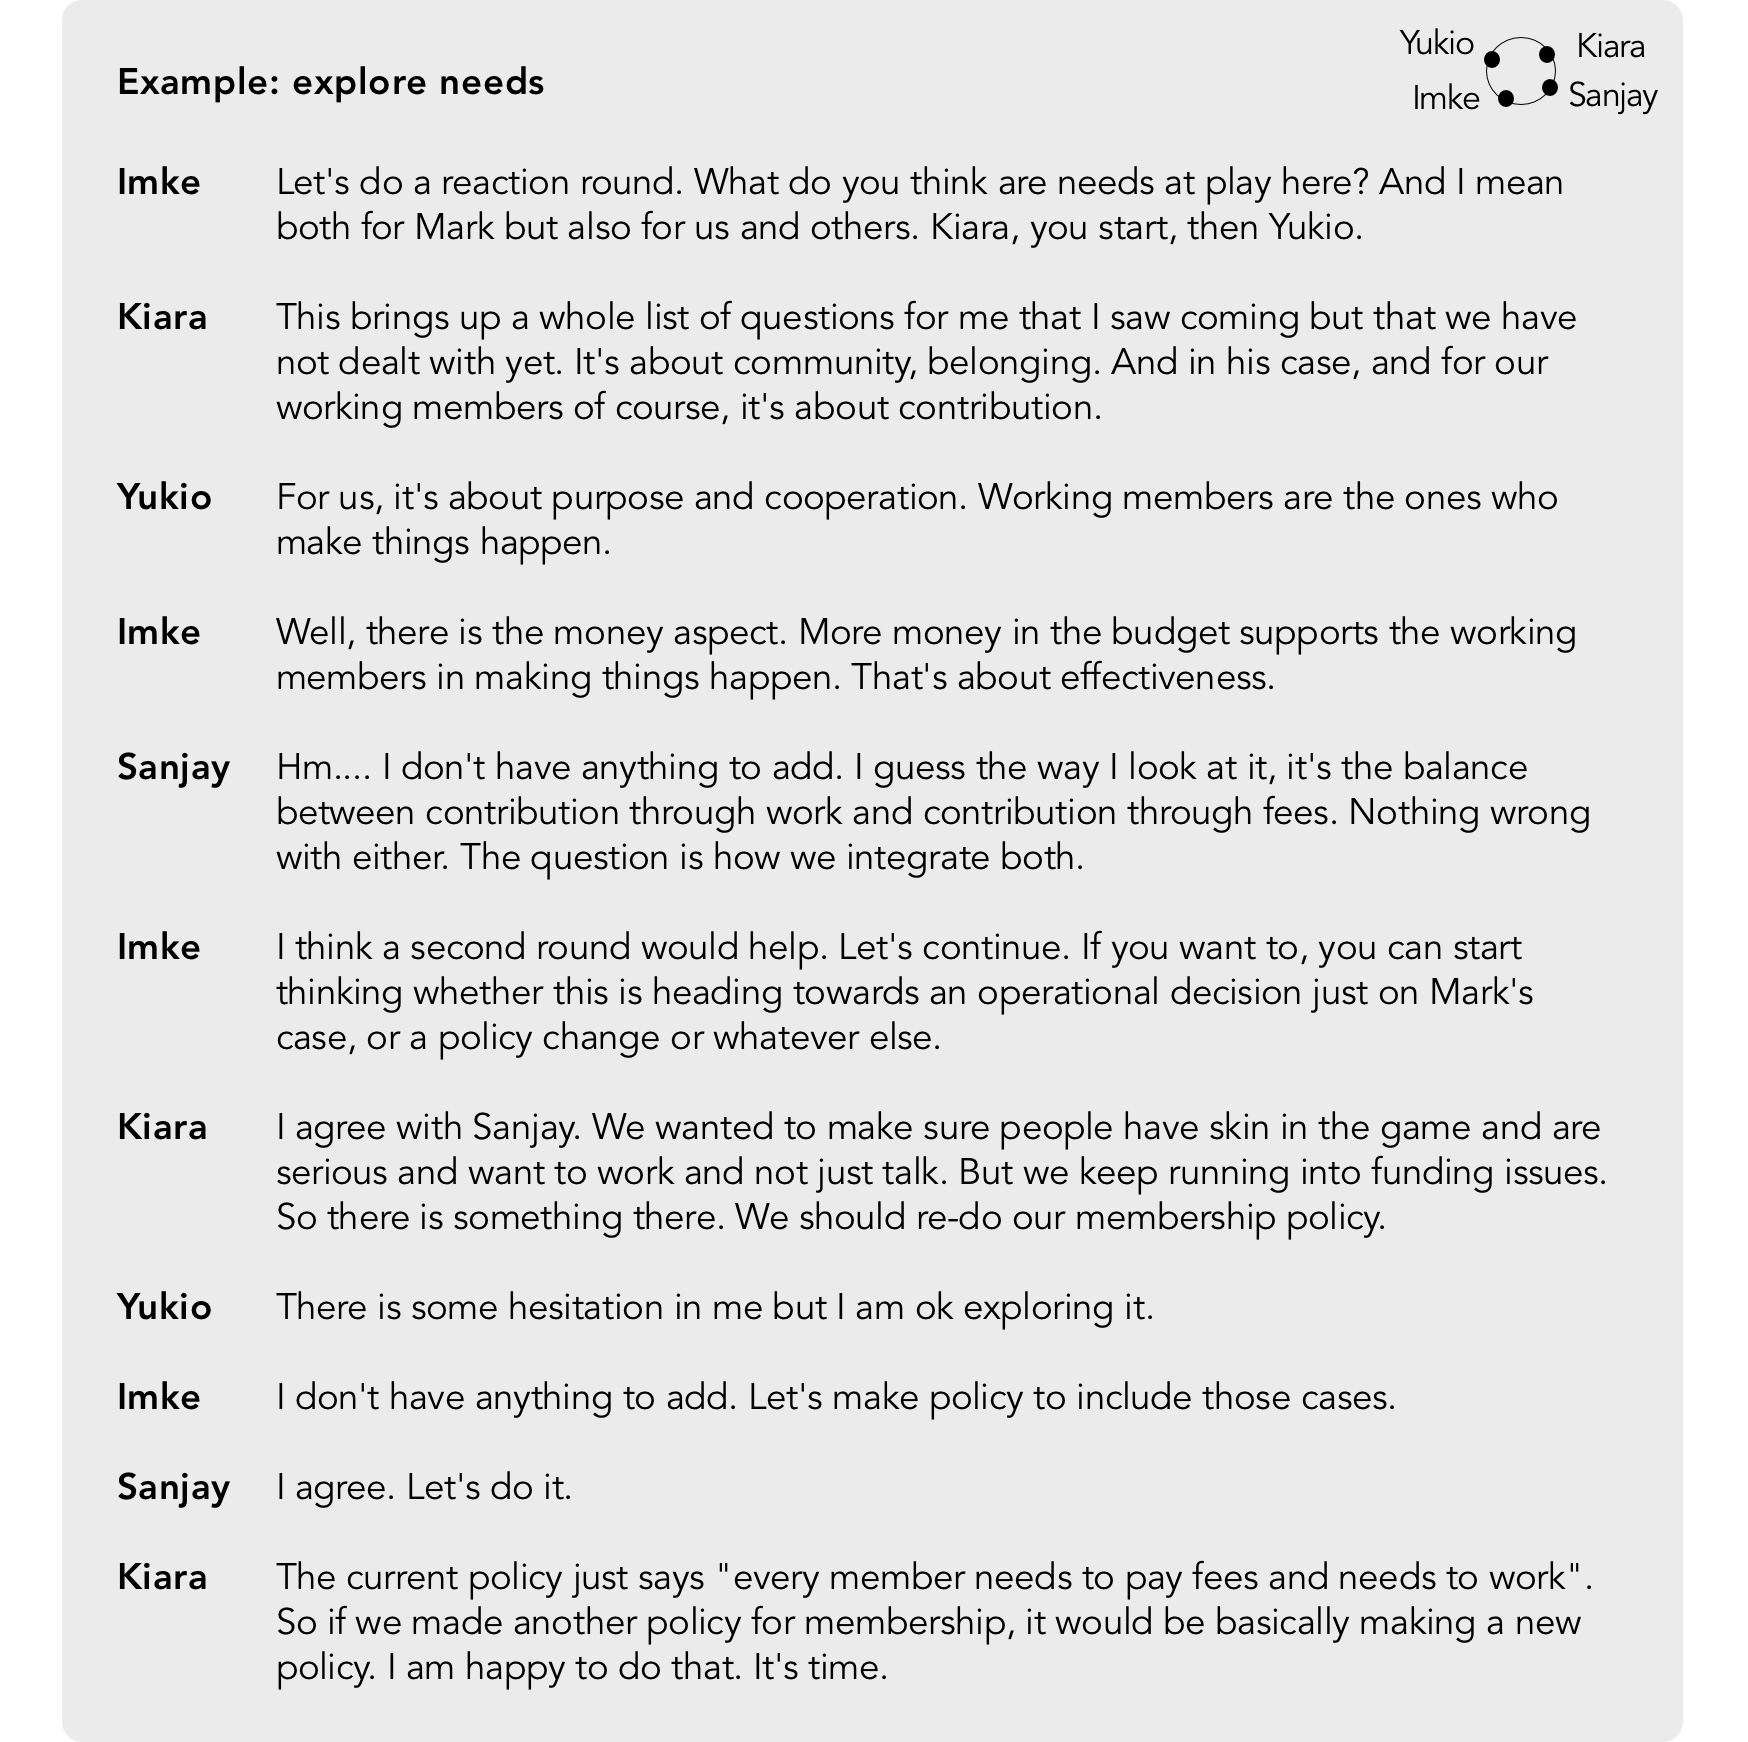 |
Note how in example Figure 3.19, “Understand: explore underlying needs” (page Figure 3.19, “Understand: explore underlying needs” @@TODO@@: Figure out page references.), the circle is looking at the issue from different angles, exploring needs of the circle members and the needs of those outside of the circle.
With a clear understanding of the issue and the needs at stake, we formulate a description of the issue and needs (see also ‘‘driver statement’’ in Sociocracy 3.0).
Intention: We synthesize what we know about the needs.
Tools: The facilitator or a circle member makes a summary statement (spoken or written).
Depending on the scope of the issue, a simple statement like “we need a membership onboarding process that is easier and more transparent” can be enough.
Alternatively, ask a helping circle (an individual or a small group) to write up the pieces collected in the previous step into a coherent document.
For a complex issue, we can ask for feedback from people outside the circle who have been affected to ensure that their needs are reflected accurately.
We ask ourselves whether the appropriate action is to make policy. (See below)
Complete when: There is consent to the needs statement and the next step.
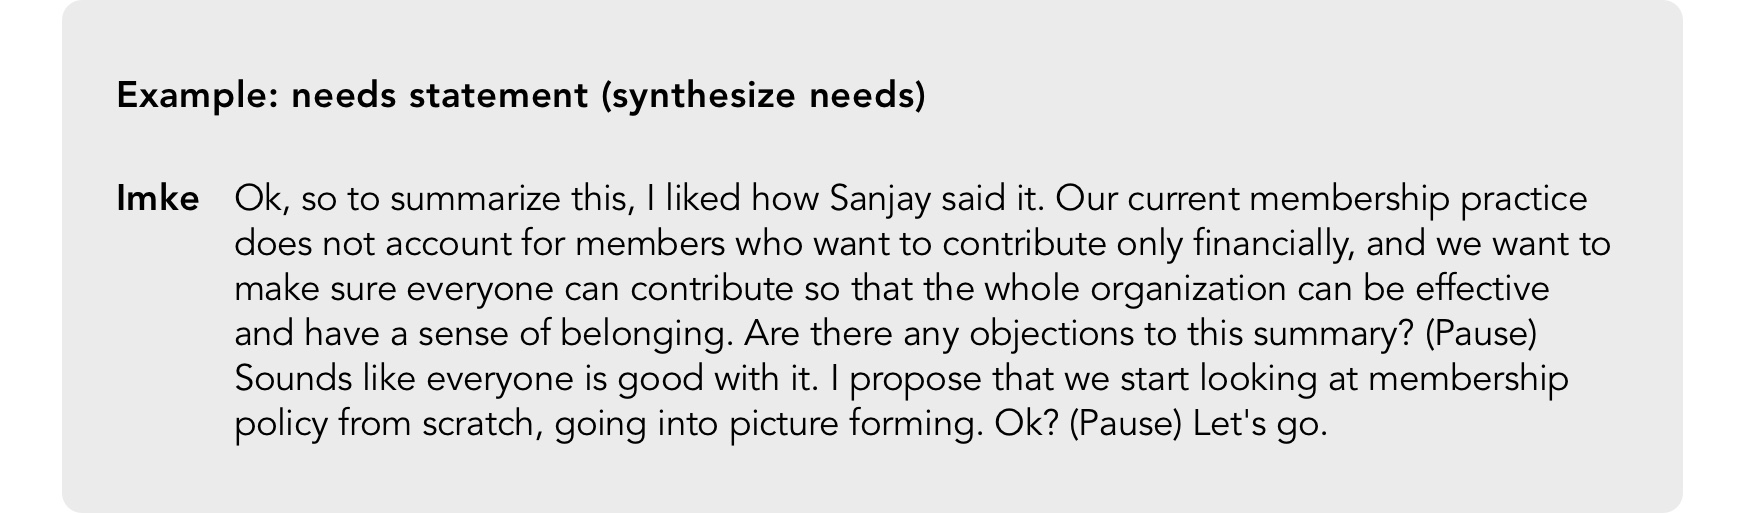
In example Figure 3.20, “Understand: synthesize issue/needs into a needs statement”, the facilitator asks someone in the circle to make a statement as a way to save time. There is typically someone in the circle who is quick at synthesizing. Keep the needs statement as you can use it as rationale when publishing the policy.
Figure 3.20. Understand: synthesize issue/needs into a needs statement
 |
Do not take for granted that the most appropriate response to the needs automatically has to be policy. Here are three options to respond to an issue:
Operational decision. If the issue is covered by existing policy, hold everyone accountable to the existing policy. We might decide to find a way to make the policy better known.
Give feedback. An often overlooked way to respond is to give feedback, for example to someone who was involved in the trigger event. If they hear about the impact of their actions on other people or the circle, this might already prevent similar events from happening. This is especially true when it is about behavior: much too often, policy is made because we are trying to avoid giving direct feedback. In order to change someone’s behavior, a direct and respectful conversation is much more effective than a policy about behavior in general somewhere in the files.
Adjust policy. Review existing policy to cover the new issue.
Overall, sociocracy practices ‘‘lazy’’ policy-making (like lazy loading in software programming where an item is only loaded once it is requested); we only make policy if the needs cannot be met effectively in any other way. Policy takes time to make, and it requires maintenance over time so do not produce policy if it is not necessary.
If the circle realizes that an issue is not in their domain, they will pass the issue on to the appropriate circle. The original circle may still write up a needs statement to pass it on as input. Keep in mind that the circle that receives the issue has to consent to taking on the issue. (If they do not accept the issue, it automatically lands in the domain of their parent circle.)
In the previous phase, we generated clean and clear input so we could work on generating a policy that puts strategies in place that meet our needs. Now we are entering the transformation stage. We are transforming the input we have (= our understanding of the underlying issue and needs) into a proposal that can be decided in the output phase. Again, this phase falls into three phases:
Understand the scope of the policy, also called picture forming.
Explore proposal ideas.
Synthesize proposal ideas into proposal.
Figure 3.21. The explore phase
 |
Picture forming helps the group prepare for gathering proposal ideas. Before focusing on possible solutions, the circle makes a checklist of items that need consideration that we call dimensions.
If we think about dimensions first, our group will be more likely to cover the entire topic without forgetting central pieces. That way, we can build a good foundation for our policy before emotions get high. It is often astonishing how many good questions come up during picture forming. Starting with opinions can easily distract a group from seeing the issue as a whole. Picture forming offers a phase where we focus on understanding the field before zooming in on solutions.
Intention: Understanding the scope of a proposal by gathering dimensions.
Tools: Ask “what questions will we have to answer to make good and complete policy?” Make sure to keep it light with short talking turns.
Write down all the dimensions and keep the list.
Gather dimensions in a round or ‘‘popcorn style” where everyone speaks as inspired.
Dimensions will have the format of phrases or of questions, but never of statements.
If people offer opinions, write them down separately for the next phase (proposal shaping) and help the group get back on track to offer dimensions instead of opinions.
Complete when: There is consent to the completeness of the list of dimensions.
Also, it is helpful for a group to start with something that connects them. For example, if we are debating accountability of dog owners, there might be very different opinions and strategies to address it. However, everyone will agree that something needs to be said about “leashes/no leashes” in a policy about dogs in a community; everyone will agree that “leashes/no leashes” is a dimension of any complete proposal on this topic (see example Figure 3.24, “Needs statement, dimensions and proposal ideas for a dog policy” on page Figure 3.24, “Needs statement, dimensions and proposal ideas for a dog policy” @@TODO@@: Figure out page references.).
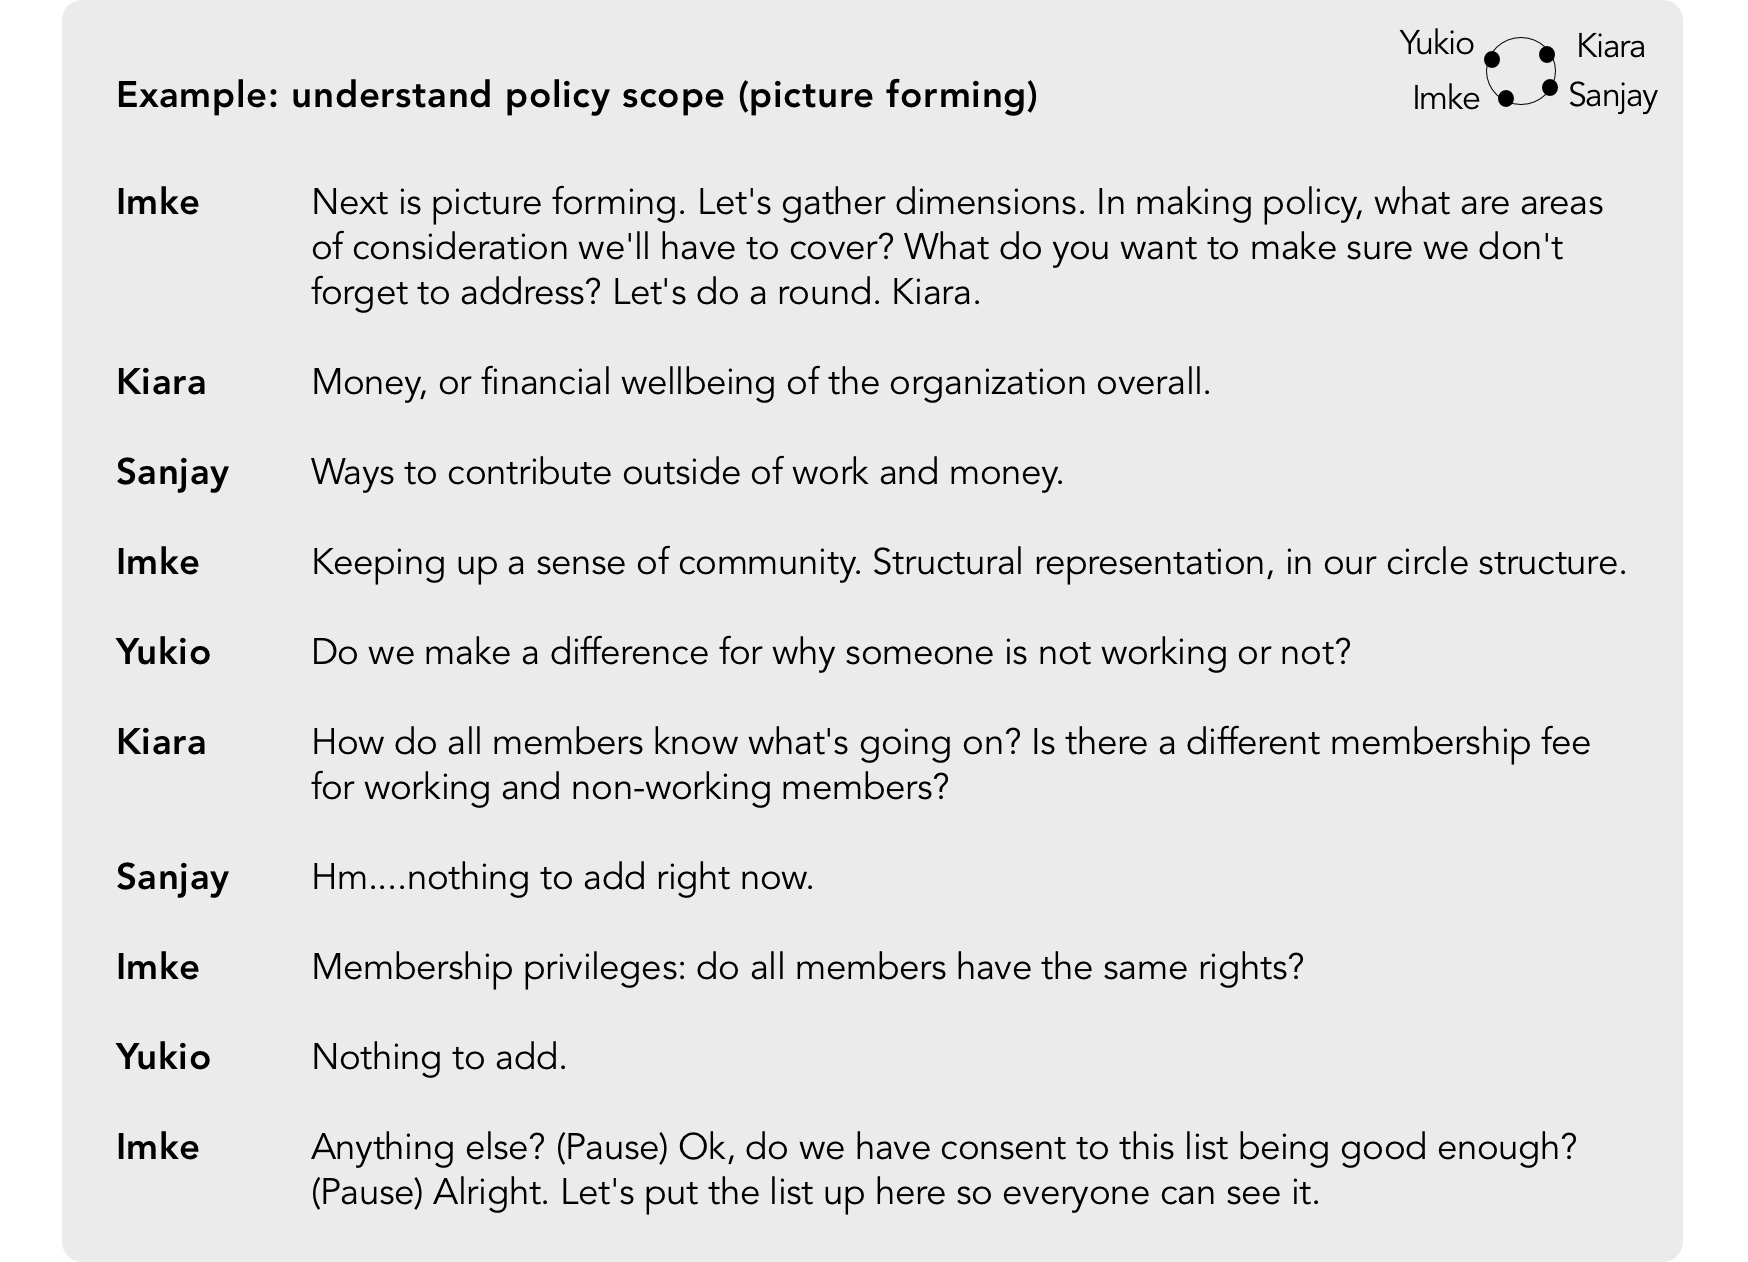
Circle members may explain a bit about the background of their dimension. It helps, for example, to name two options (“do we do A or B?”). See example Figure 3.22, “Explore: picture forming (policy scope)” for illustration. An experienced group will gather keywords fairly quickly, within a few minutes. Groups get better with experience. The best way to learn picture forming is by example. If the group is new to the process, then someone with experience might model by giving their own dimensions before asking for the group’s suggestions. With inexperienced groups, we might have to explain more and perhaps extract dimensions from opinions they share.
Caution: if there are a lot of dimensions, we might be dealing with a question that is too big. We will get way too many proposal ideas and might get overwhelmed. In that case, we can divide up the dimensions into related chunks and deal with them separately or form a helping circle to prepare the next phase.
Figure 3.22. Explore: picture forming (policy scope)
 |
Before moving on, we consent to the list. This is a “good enough for now” decision. It is fine to add new elements coming up later. We ask for consent so we can be sure we are ready to enter the next phase and no one is cut off who still has dimensions to add.
In this phase, we want to hear all the ideas of what could be done to solve the issue, considering the needs of everyone affected (as stated in the needs statement). Have your list of dimensions visible to inform your group on what we want to cover. While dimensions are phrases or questions, proposal pieces are typically statements starting with “I think we/there should…”, like “I think we should introduce a membership fee of $50 per month.”
Picture forming and proposal shaping break up the – sometimes daunting – process of formulating a proposal into doable steps. This participatory process draws on group wisdom and can be very creative and productive. At the same time, since no one circle member has to come up with the perfect proposal alone and everyone can put their heads together, the task becomes more doable.
Intention: Exploring ideas of how to solve the issue.
Tools: Hear the circle’s proposal ideas, preferably in several rounds. Circle members can suggest proposal pieces that cover one or more of the dimensions mentioned.
It is better to do several rounds of brief statements than to only do one round. With short rounds, it will be easier to build on each other’s creative ideas.
This is not the place to lobby and give a long-winded rationale. Ideally, we dictate the proposal ideas and maybe give some context. Avoid any energy that is about convincing others as it will inhibit flow.
Create a safe space. We want every member to speak from their experience. One way to make sure we do this is by only allowing affirmative statements (“I think we should…”) but no evaluative statements about other people’s proposal ideas such as “I don’t think that x is a good idea.”
The proposal pieces are allowed to flow. They can:
contradict each other
extend each other
make a previous statement more detailed
It is a good idea to write proposal pieces for all to see, ideally close to the list of dimensions. Appoint a scribe to write down ideas, or let the secretary do it.
There does not have to be a 1:1 relationship between dimensions and proposal pieces. Some proposal pieces might cover more than one dimension, and a proposal piece can only be a partial answer to a dimension. If we notice a new dimension, we simply add it to the list.
We can start to group proposal ideas into themes but only if that is easy to do in real time. It is more important to gather proposal pieces than to organize them.
Proposal shaping can be done asynchronously, for example in a virtual document.
Complete when: No one has another proposal idea to add and every dimension is covered by at least one proposal piece.
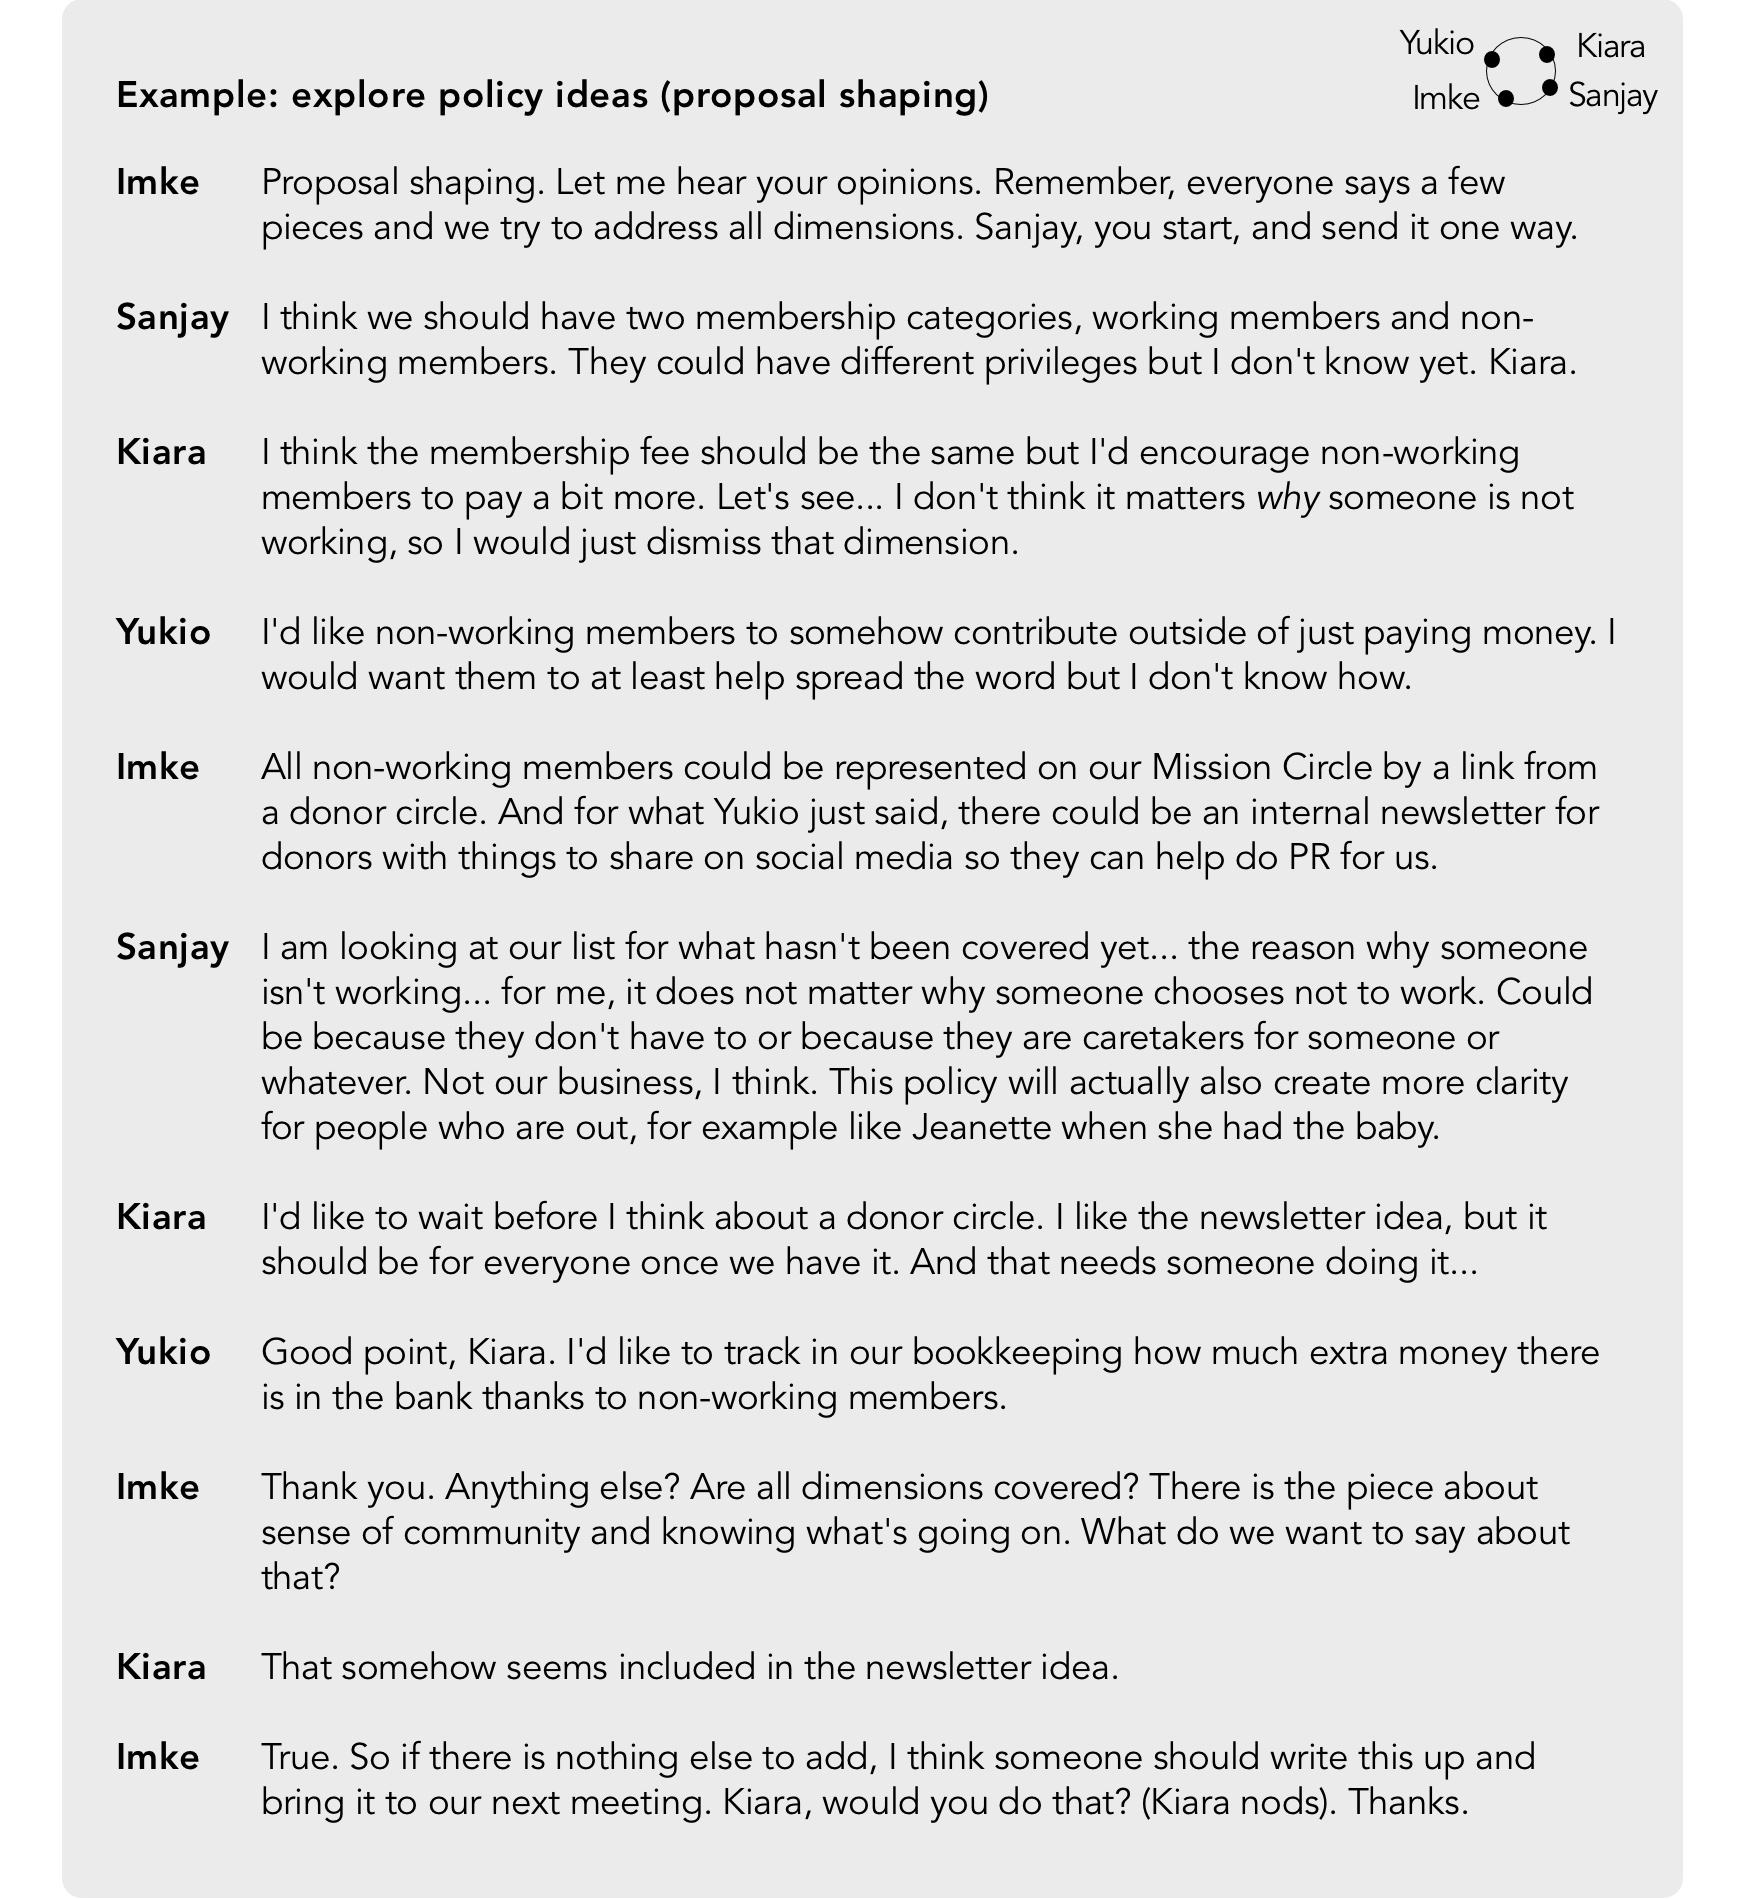
While in picture forming, we were trying to understand the issue and its dimensions. In proposal shaping, we want opinions. Example Figure 3.23, “Explore: explore policy ideas (proposal shaping)” gives us an idea of what this might sound like.
Figure 3.23. Explore: explore policy ideas (proposal shaping)
 |
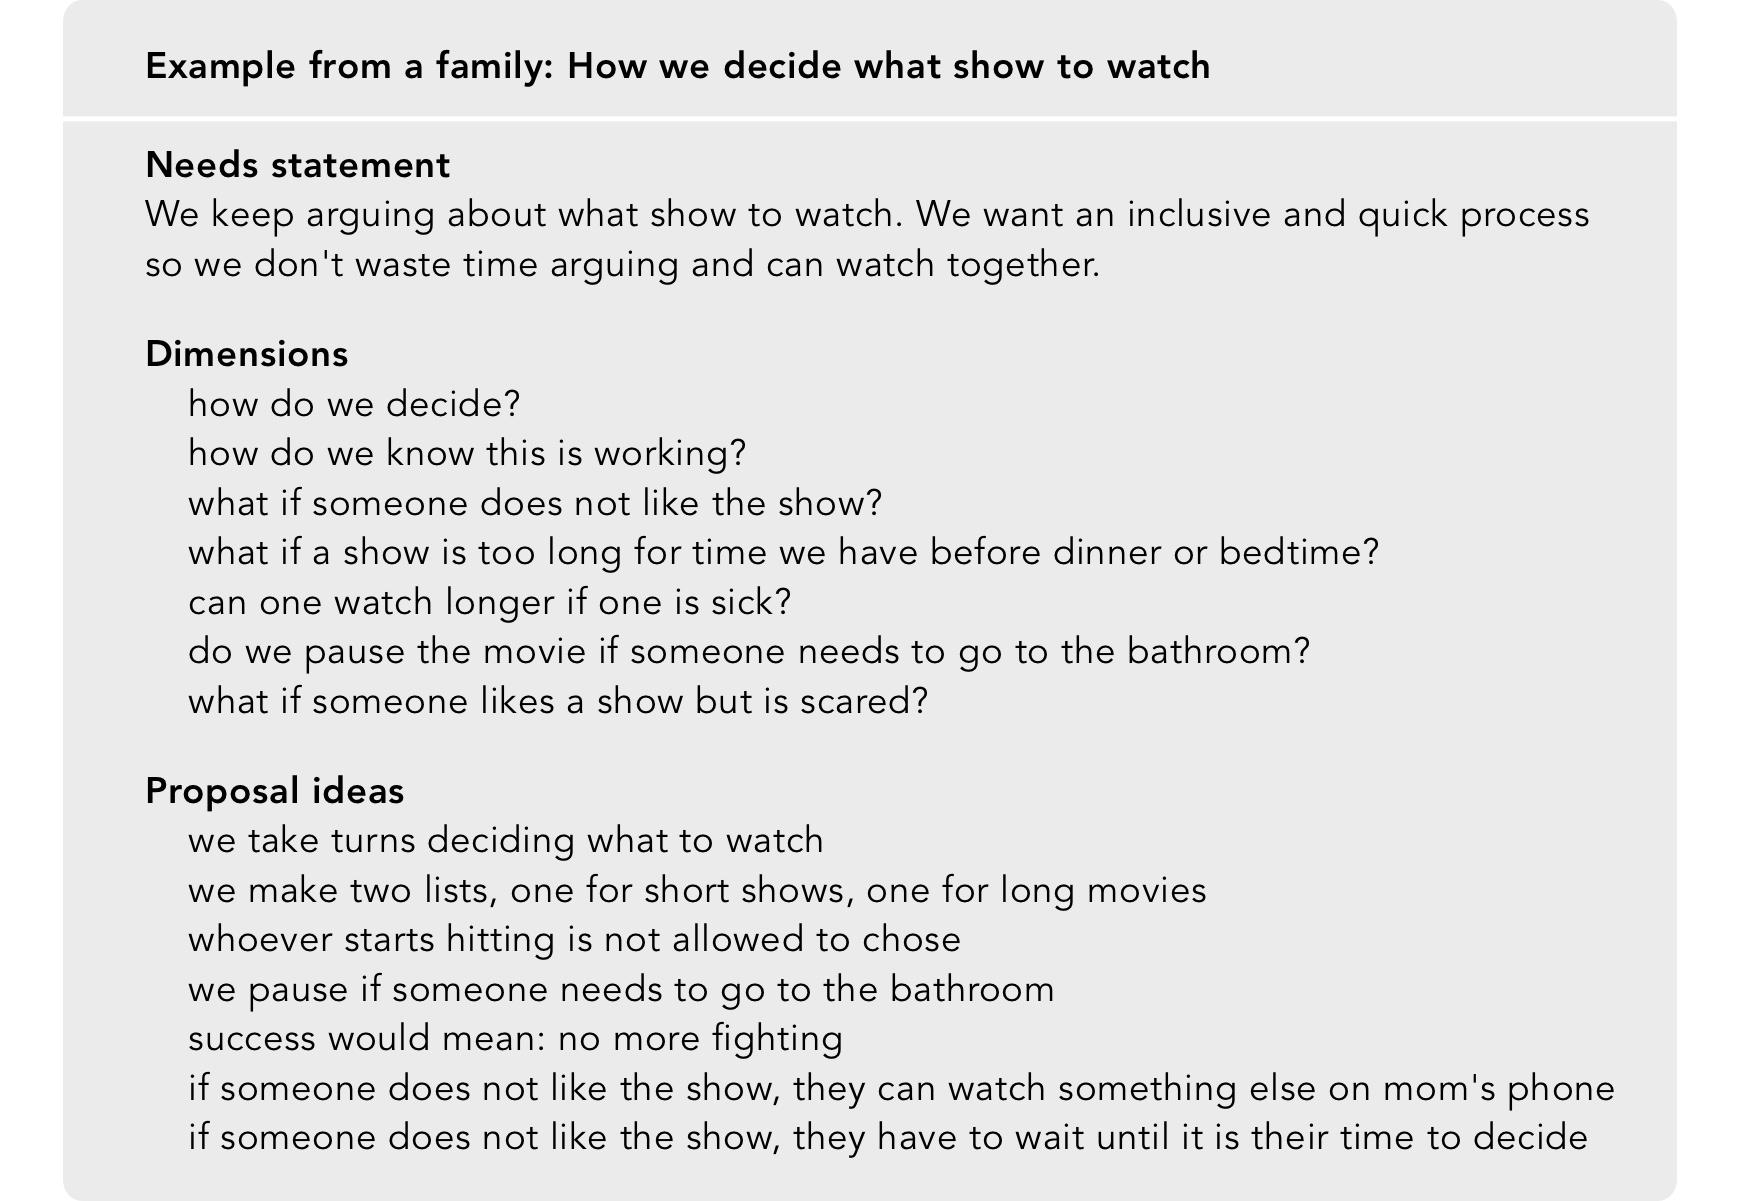
Examples Figure 3.24, “Needs statement, dimensions and proposal ideas for a dog policy” and Figure 3.25, “Needs statement, dimensions and proposal ideas for a screen policy (children aged 4-10 contributing)” show how proposal ideas can build or contradict each other. (The lists in Figure 3.25, “Needs statement, dimensions and proposal ideas for a screen policy (children aged 4-10 contributing)” are from a real-life process in our family on a chronic source of arguing!)
Figure 3.24. Needs statement, dimensions and proposal ideas for a dog policy
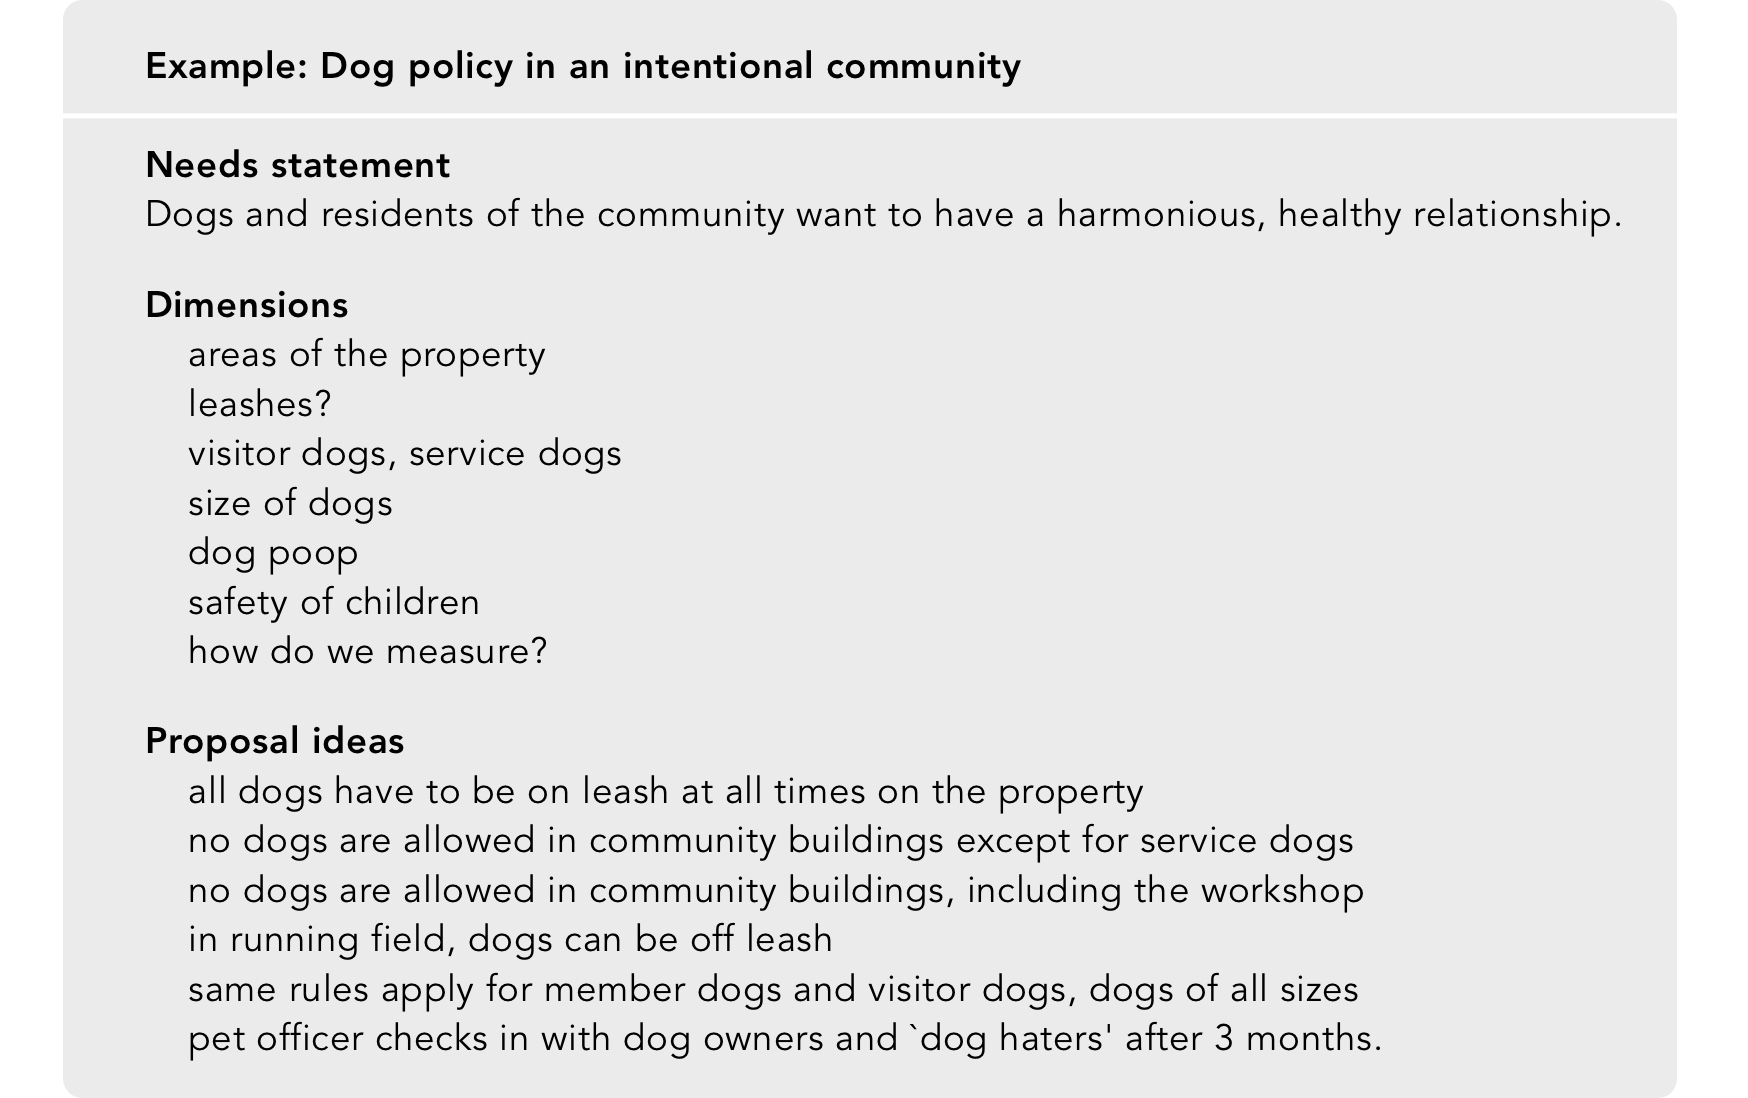 |
Figure 3.25. Needs statement, dimensions and proposal ideas for a screen policy (children aged 4-10 contributing)
 |
How do we turn the list of proposal ideas into a proposal?
For this step, we want to keep in mind that we are looking for a solution within a reasonable amount of time that works for everyone (i.e. that lies within everyone’s range of tolerance). We are writing down a proposal early because that is what gets the group to the next level instead of continuing a conversation about personal preferences. We put out a proposal so we can surface objections (if there are any) sooner than later.
Intention: Synthesizing ideas into a proposal.
Tools: This step benefits from having only a few people, or even just one individual to write up the proposal. First go through the straightforward parts, the dimensions that only have one proposal piece covering them and that seem uncontroversial. Isolate the proposal pieces that seem contradictory. There are different scenarios:
All proposal pieces are compatible and everything is covered. This might be a simple issue – all the proposal pieces seem to go together well and we might realize how much we are on the same page. The proposal generating process has guided us through making a proposal draft in a participatory way and we just have to come up with coherent wording.
Some areas of our proposal pieces seem straightforward, some are highly controversial, incompatible proposal pieces. We now know what is controversial and what will need more attention. Note: we are not trying to solve the controversial issues right now, as that comes later. For now, we just notice the differences in opinion. See below for more guidance on how to navigate controversy.
We are noticing that we do not have enough information. If there is essential information we need to get before moving ahead, we can do a round on how to gather the information we need, and make an action plan. We do not want to hit the same wall again next time the issue comes up.
We write up a proposal and double-check whether we have addressed all the dimensions so we do not lose information in distilling the proposal pieces. If we leave some proposal ideas out of the final proposal draft, we say so and say why clearly.
Complete when: There is a written proposal that covers all the dimensions.
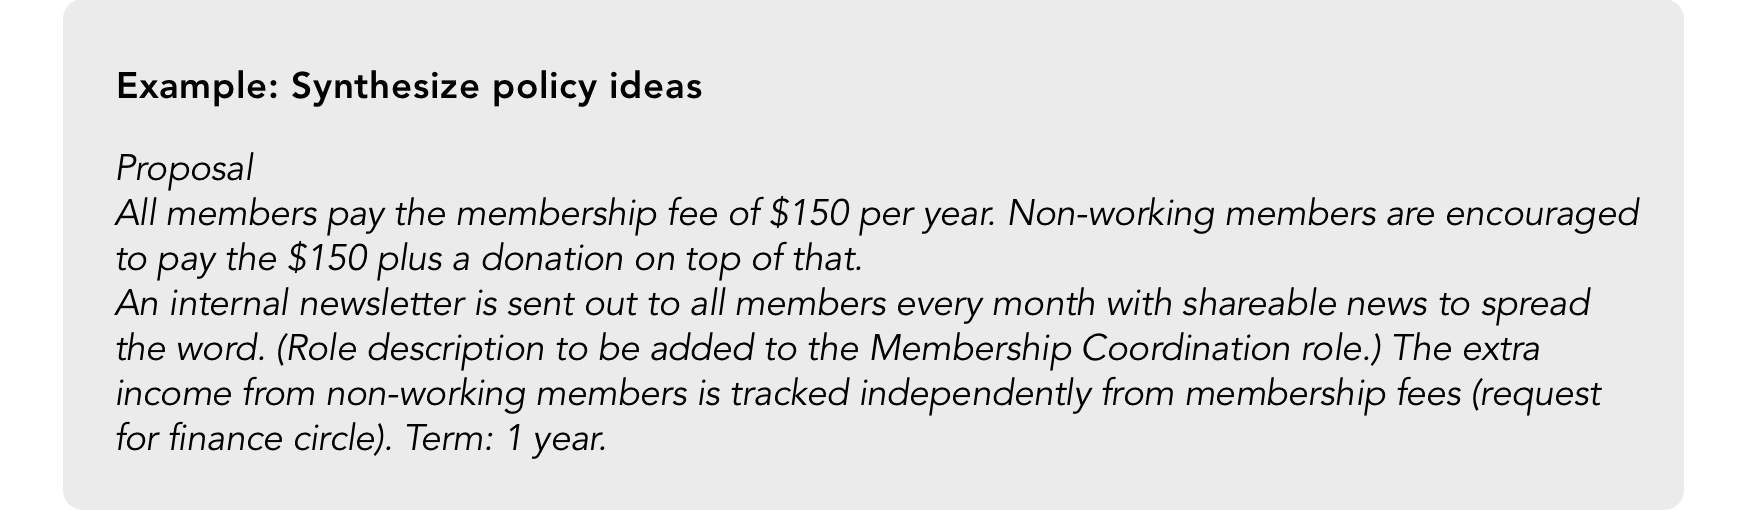
As in example Figure 3.26, “Explore: synthesize proposal ideas into proposal”, it works well to either have an individual or two people work on wording the proposal between meetings, or we might take a short break during the meeting to have someone write something up. If there are contradictory proposal ideas, there are at least three options:
We can do reaction rounds for each controversial proposal idea. That will inform how we can distill the proposal ideas into one proposal.
We can just make a choice. There is no risk in making a proposal, as anyone can object later.
We can include the contradictions into the proposal. We can write “webinars will be held on always the same one day of the week: Tuesdays/Thursdays” although that is inherently contradictory. That way, we can flag an item for discussion as we integrate objections. Offering contradictory proposals to provoke objections is confusing to some, but it does honor all the ideas that were generated. We only do it with facilitators that feel confident with the process.
We can break it up. If a subject seems to be sidetracking a discussion, and we are worried about including it in the proposal, we can also break it up into chunks and decide separately.
Figure 3.26. Explore: synthesize proposal ideas into proposal
 |
The more co-creative the proposal-writing is, the more ownership and energy there will be for the proposal, and it will most likely be better quality. There is no requirement, however, that proposals only be generated as a group through the process we have described. There are other ways of coming up with a proposal:
A circle member might write or re-write a proposal and offer it to the circle for approval.
A circle member might feel inspired to solve a problem or define a workflow and write a proposal down before including the circle.
The circle might decide to look at an issue together, gather feedback and let one circle member write up a proposal from what they heard, skipping picture forming and proposal shaping altogether. While this is a time-efficient way of working, in our experience the quality of the proposal might be low, which might lead to the circle tweaking the proposal a lot. Sometimes, taking fast tracks like this only makes the process longer.
The proposal might come from outside the group or even from outside the organization, like from a policy repository or a sample governance document.
A group is ready for the consent process when there is (a) an understanding of the need and (b) a concrete proposal on the table.
The three steps for making a decision are preparing the decision, deciding and publishing. Each of those steps, again, falls into three steps. The structure of this section follows the 3x3 steps:
Figure 3.27. The third phase of the policy process falls into three steps itself
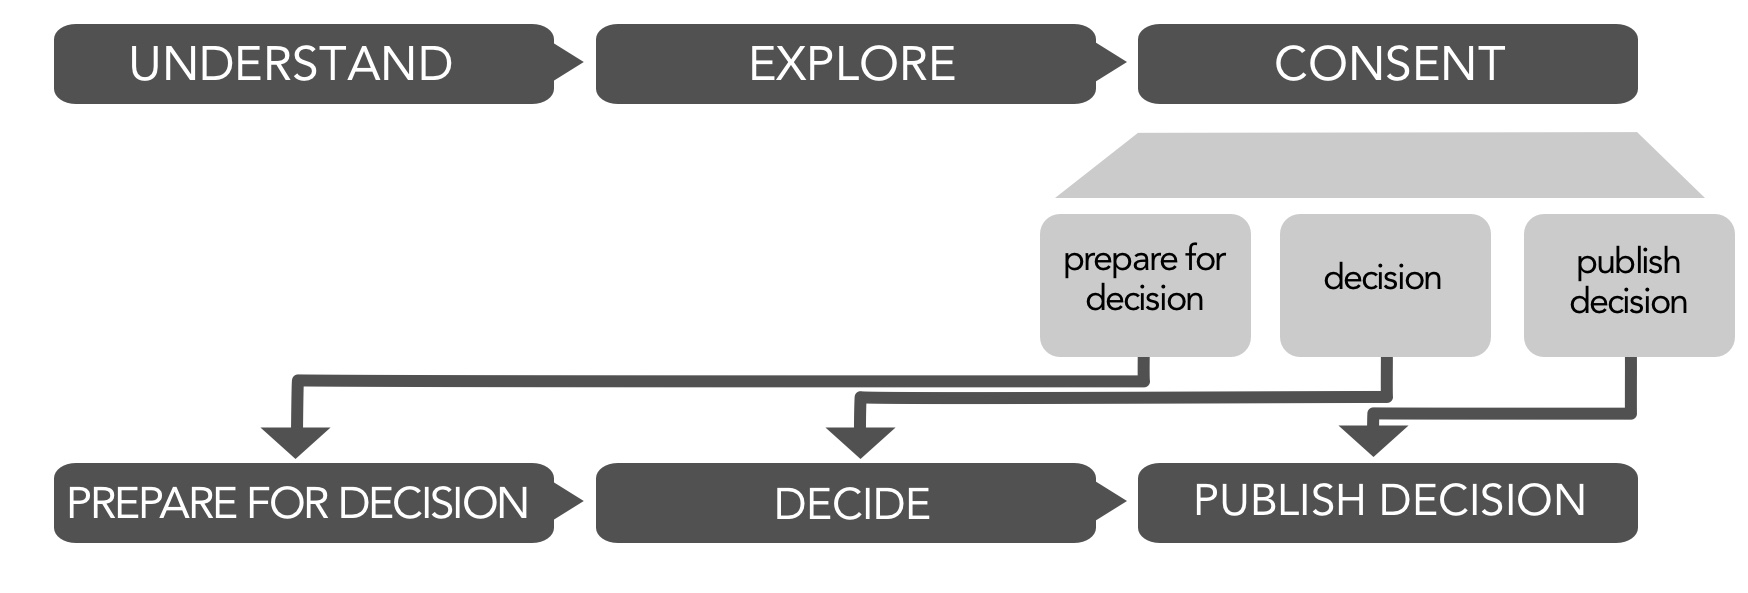 |
Before we can make a decision, we want to make sure the proposal is ready. Present the proposal and make sure everyone understands it. Then the group gets a chance to react to the proposal. We can make any amendments we want to include in the consent round.
Figure 3.28. The third phase falls into 3 steps
 |
Presenting the proposal is important so everyone knows what the proposal is. This is especially important when the proposal:
has had previous versions
has been generated rather quickly
has not been generated by the group that is making the decision
Sometimes people only skim a proposal and do not really know what they are consenting to. Make sure everyone knows all the relevant aspects of the proposal. This is the place to gain clarity, not the place to question the effectiveness of the proposal – this will come later.
Intention: Everyone in the circle needs to understand the proposal as-is.
Tools: Present the proposal. That means read it out loud, or find another way of ensuring that everyone in the room knows what the proposal says.
Make the proposal accessible ahead of time, or allow enough time during the meeting for circle members to read the proposal. Allow time for questions.
Ask questions in a round. A good prompt to start a clarifying questions round is to ask the circle “what do you need to know so you understand the proposal?”
If a group is new to this process, it is helpful for everyone to use a response template so they don’t drift into sharing opinions, for example:
“I understand the proposal. I have no questions.”
“I would like to have a better understanding of the proposal. Could you tell me more about the part that says …?”
“I would like to have a better understanding of the proposal. Could you tell me more about what led you to include the part in the proposal that says …?”
Complete when: No one has open questions about the proposal.
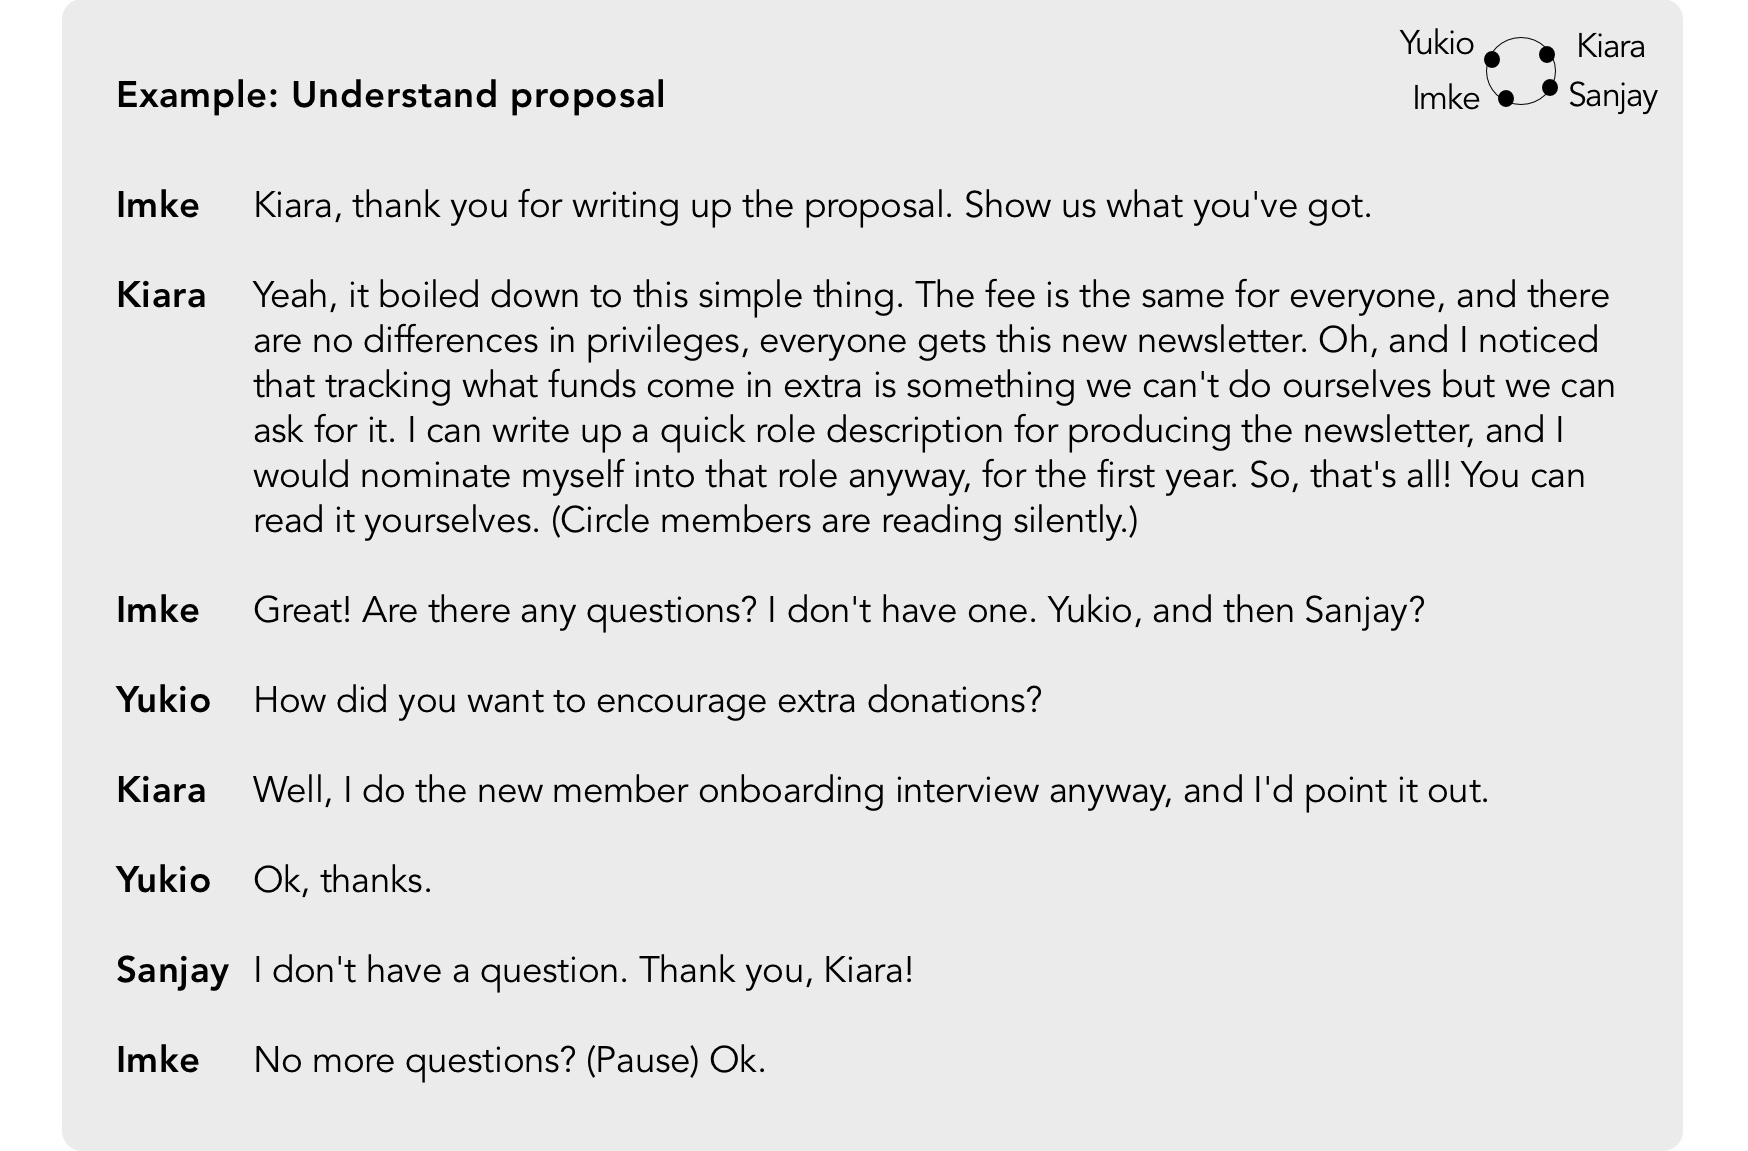
For straightforward questions, we can let the author of the proposal or someone else answer the questions one by one as they are asked in the round. If the questions are more complex or may lead to follow-up questions, then it is often better to collect all the questions in a round first. Doing it this way prevents long digressions that may break the equivalence of doing rounds, and also may prevent drifting into opinions before all the questions for understanding have been asked (see example Figure 3.29, “Understand: understand the proposal”). When all questions are answered, we can ask whether there are more questions that might have come up after hearing the previous questions and answers.
Figure 3.29. Understand: understand the proposal
 |
In the quick reactions round, everyone gets a chance to give their opinion on a proposal. It is important for every contribution to be brief. Five sentences or less is what a group should be aiming for. If someone has an objection they will have more time to speak later!
Intention: Preparing the group and the proposal for decision making.
Tools: Do a round where everyone expresses their opinion about the proposal.
The quick reactions can have different flavors: exploring how circle members feel about it, or whether the proposal is ready for a decision.
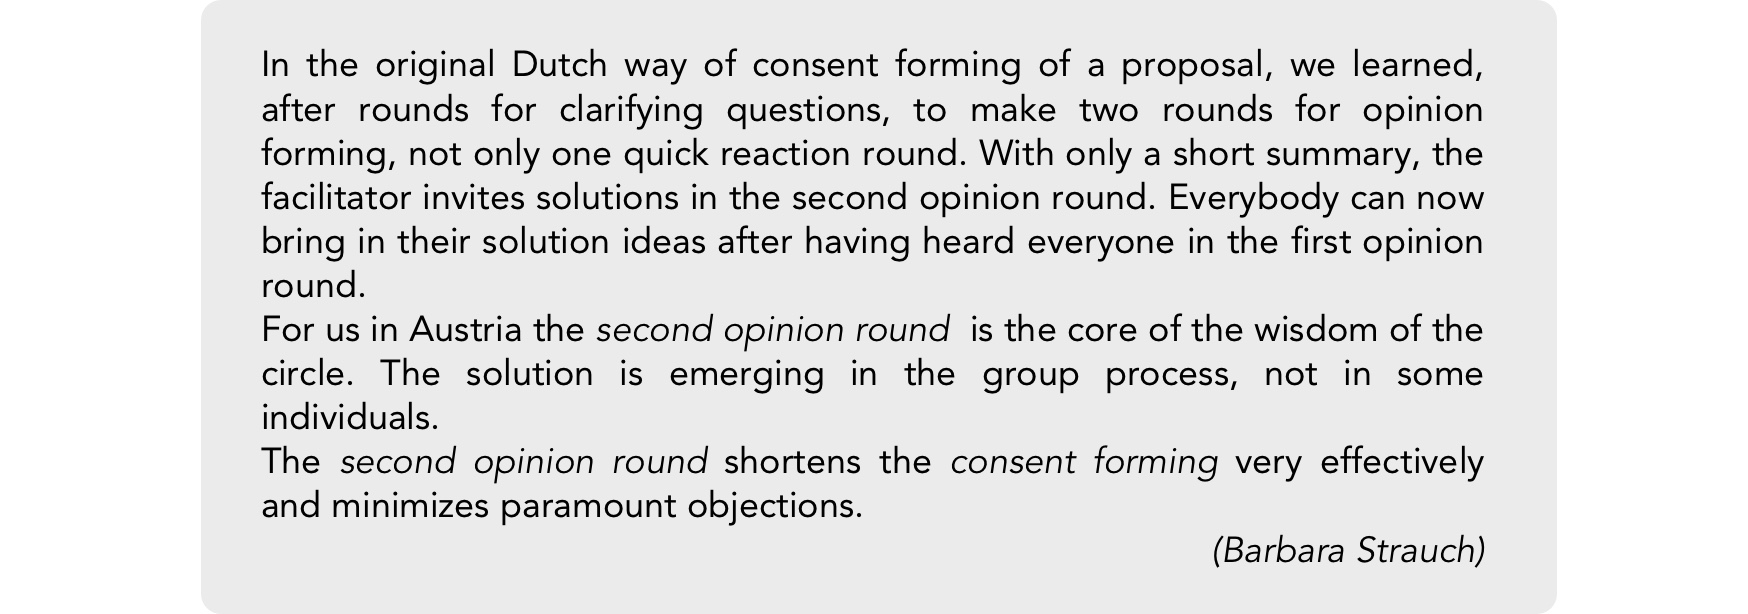
Some groups prefer doing two separate rounds: one for emotional reactions (“reactions”), and one for improving the proposal (“solutions round”; see Fig. Figure 3.30, “What others say”.)
Never skip the step completely. The minimal version is to ask “is there anything you’d like to say before we’re moving to the consent round?”
Complete when: Everyone has been able to voice their reaction(s) to the proposal.
Note: the measure is not that everyone agrees with the proposal. We do not attempt to tweak the proposal in an effort to achieve unanimity, as we might lose time over irrelevant details. Instead, we move to consent. If we are not sure whether the group is ready, we just ask, for example by saying “is there anything else that really needs to be said before we go to the consent round?” Here are some areas that can be touched on in quick reactions.
Whether someone likes the proposal or not, as quick as “I like this proposal because…”
Members might say that they are planning to object. We can keep it brief in the quick reaction round -- the time to explain an objection will come later. For this round, a one-sentence statement like the following is enough: “I do not support this proposal because I don’t believe it effectively supports the organization’s (aim to/value of)…”
Appreciation for the author or the process, or other individuals who supported the process
Improvements in wording
Small changes that are in alignment with the proposal (in the consensus tradition, those are called ‘‘friendly amendments’’, a term we are adopting – see below)
We can do a second round if
new information has come up near the end of the round, or
there is emergence and something is building and we want to explore it. (See box Figure 3.30, “What others say”.)
Figure 3.30. What others say
 |
We prefer for people not to pass during the reaction round because it is a useful temperature check. We get to hear what others think, where they are with the proposal, what it means to them and what their concerns are, which might not rise to the level of an objection. Especially on controversial topics, it is important to make sure that everyone has been heard sufficiently. However, it is also important to keep statements brief and relevant since it is most effective to devote time to addressing objections. Example Figure 3.31, “Understand: explore quick reactions” shows a quick reaction round and its variant in Figure 3.32, “Example of a quick reaction with an objection coming”, heading toward an objection.
Figure 3.31. Understand: explore quick reactions
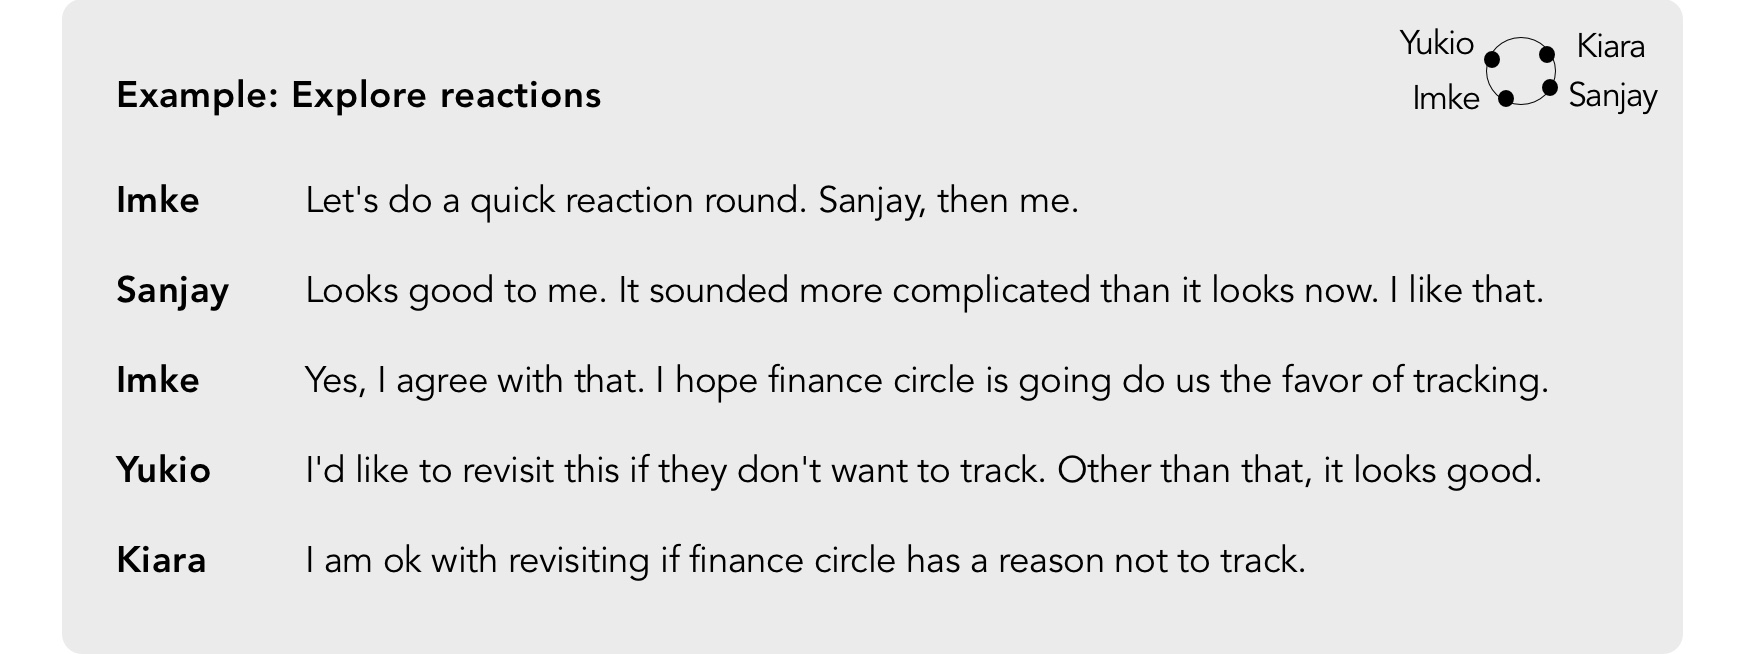 |
Figure 3.32. Example of a quick reaction with an objection coming
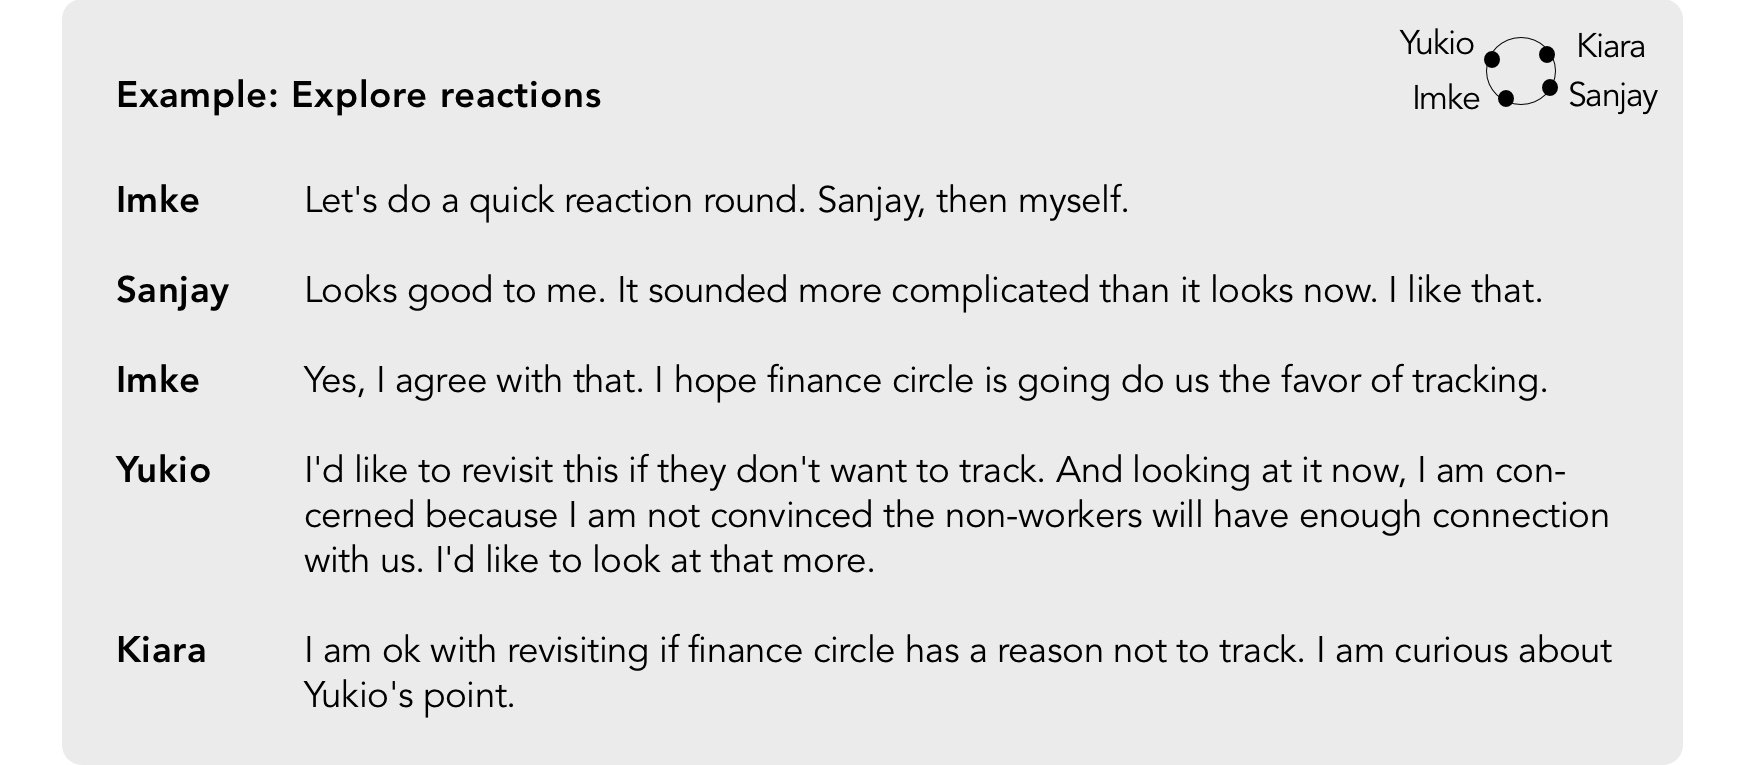 |
Note how in Figure 3.32, “Example of a quick reaction with an objection coming”, the circle member summarizes the concern in one sentence. The objector-to-be knows he is going to be heard later, so one sentence is enough to give everyone a sense of where this is going. Just saying “I will object” without giving any context might be unsettling for a group; but it is also not the right place to say a lot more than a few sentences, so keep it short!
Also notice how the circle just continues with the process -- hearing that someone will object does not stop the round. For that reason, it is ok for the facilitator to move to the consent round, trusting that the circle member will object and that the group will benefit from the discussion of objections one by one.
We take a moment and reflect on what we learned in the quick reactions. Is the group ready? Is the proposal ready?
Intention: Synthesizing quick reactions.
Tools: The facilitator needs to assess whether the proposal is ready.
The facilitator might choose to take a few moments to think through what might be the best idea. This is a good moment to slow down!
If there have been several suggested amendments, there are different options.
The facilitator can skip, merge, bundle and adjust suggested amendments.
The facilitator can decide to move amendments to a later time. For example, the group could consent to the proposal as is and consent to the amendment after.
The facilitator is always free to ask someone else to state the proposal.
Complete when: The proposal and the circle are ready for the consent round.
If we decide that either the group or the proposal isn’t ready, we can arrange for a re-write, schedule the decision for a later date or do whatever we can to facilitate the process towards clarity.
Friendly amendments, in the tradition of consensus, are amendments that might come up in the quick reaction round, that seems to be aligned with the spirit of the proposal.
We want to be aware of the pros and cons of friendly amendments so we can understand better what the dynamics are and how to navigate them most effectively and efficiently.
The advantage of a friendly amendment is clear: it can be a fast-track to an improved proposal. But there are disadvantages.
Friendly amendments can prolong the process. Note that friendly amendments change the proposal, sometimes in unexpected ways. A circle member and the facilitator might assume that an amendment they suggest is uncontradictory. But for a third circle member, an innocent-looking amendment might change how well the proposal works for them and they might end up objecting to the proposal because of the amendment. In that case, we have lost time because we will have to process the objection.
In a similar way, friendly amendments can create frustration. Imagine a group having crafted a proposal very carefully and thoroughly and then pieces of it get changed “on the fly”. (Then again, ignoring friendly amendments can create frustration as well.)
Accepting friendly amendments can create sloppiness and make the process foggy. It can get chaotic and rushed. It is easy to lose track of what version of a friendly amendment made it into the proposal. Slow down.
Get clarity by showing the changes visually or by re-reading the proposal.
If we make too many changes in the quick reaction round, since you basically have a new proposal, we might have to start at the beginning of the consent process (present proposal, clarifying questions etc.).
We recommend that the facilitator and no one else make the decision of what amendments are accepted in this phase. (Or the facilitator appoints someone to make that decision.) Ultimately, the facilitator is responsible for process during the meeting. Too many cooks will slow down the process with uncertain benefit. The facilitator’s task is to avoid confusion and to move the group along without cutting people off. If the facilitator is starting to feel uncomfortable with the process, ask for consent on the original proposal and then ask for new proposals that might build on the just-approved proposal. If someone is making a counter-proposal, we have to be even more alert. (See section Section 5.5.3.7, “Counter-proposals” on page Section 5.5.3.7, “Counter-proposals” on counter-proposals.)
In example Figure 3.33, “Synthesize reactions”, things are easy – only a small amendment needs to be considered and the facilitator decides to move to the consent round.
Figure 3.33. Synthesize reactions
 |
Proposal and circle are ready to make a decision. The three steps in this phase are:
Figure 3.34. The consent phase
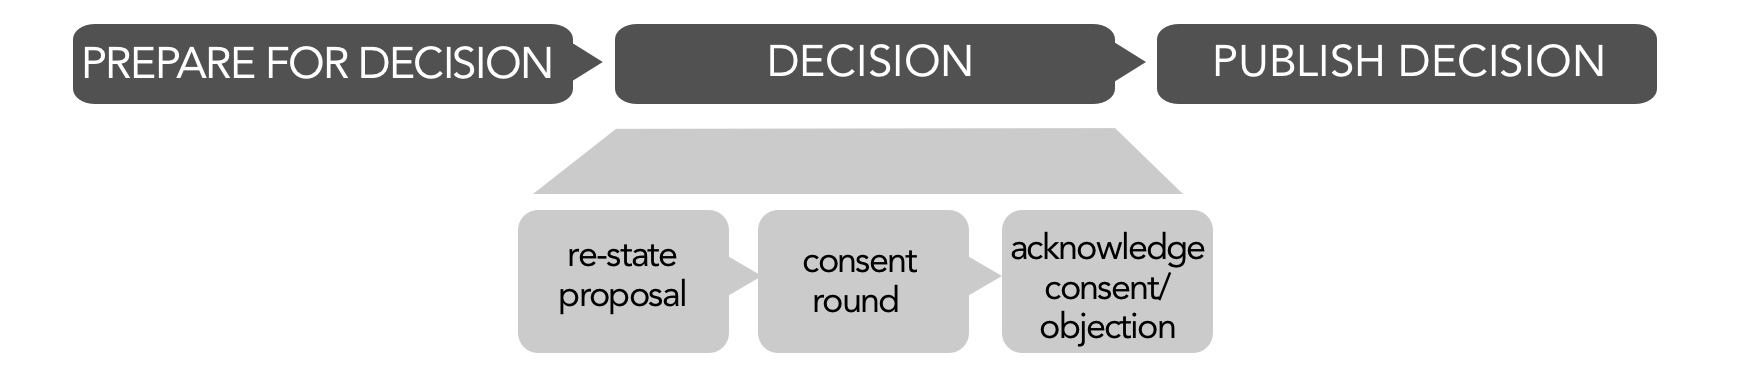 |
Even though all steps might be brief, it helps to be aware of each of them and go through them quickly but in an orderly manner. Rushing through a decision can lead to lack of clarity or frustration.
At the beginning of the consent process, we make sure we state the proposal in its most current wording. The intention is to be clear without being repetitive. If the proposal is simple or if it has not changed at all, just acknowledge that and move to the consent round. The more changes there were, the more important it is to read it again in context.
Intention: Make sure everyone has clarity about the (possibly modified) proposal.
Tools: Read the proposal, or ask someone else to read it.
In example Figure 3.35, “Explore: re-state proposal”, the facilitator refers to the written version of the proposal and verbally adds an amendment.
Figure 3.35. Explore: re-state proposal
 |
It is now time to hear from each circle member whether they have objections. Consent is binary: one either consents or objects. In the consent round, we focus on objections. (See section Section 3.2.5.1, “The difference between consent and consensus” on page Section 3.2.5.1, “The difference between consent and consensus”.)
Intention: Hearing objections to the proposal.
Tools: In a round, ask every circle member whether they consent or object. It is important to make sure people notice that this moment is the actual decision phase.
There are several ways of giving consent, like saying “consent, I consent” or “no objection(s)”. Given the definition of objections, it all means the same. An answer like “yes” or “no” depends on whether we ask “do you object?” or “do you consent?” Being too informal often means lack of clarity.
Consent is an active process. If we sense that someone is giving in, we try to get their hesitation into the open. For some people, it is hard to object (for cultural or personal reasons). Ask “I heard some hesitation? Anything you want to share?”
Consent can be given using hand signs like thumbs up or something comparable if the group has agreed-upon signs.
The best version might be “Do you have any objection?” That way, one can affirm in the case of an objection, which is easier to do. Some groups even call the consent round the ‘‘objection round’’ to support members in objecting.
Complete when: Everyone has either consented or objected.
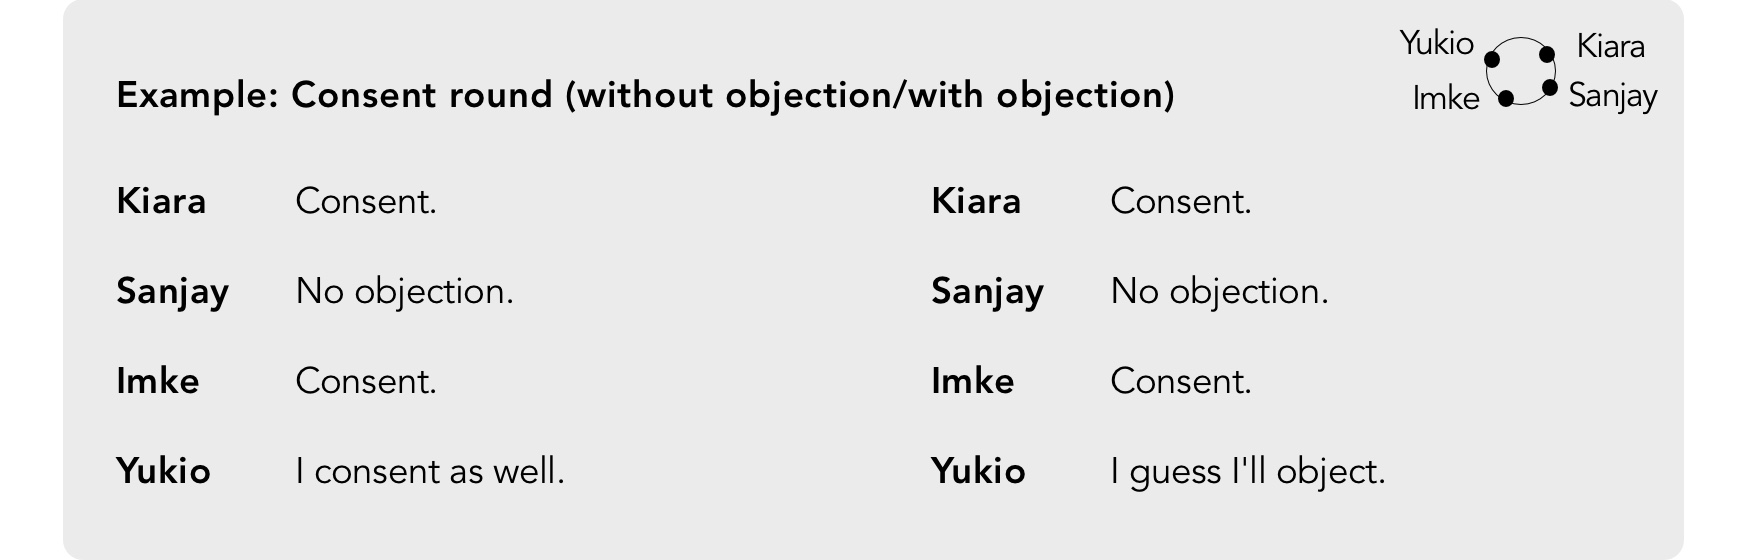
Example Figure 3.36, “Explore: consent round without and with an objection” shows what a simple consent round without and with an objection sounds like. As in the right-hand example, finish the consent round, hearing from every member.
Figure 3.36. Explore: consent round without and with an objection
 |
After everyone has consented or objected, acknowledge that there is consent or that there are objections. For objections, go through the objection process (see section Section 3.5, “Integrating objections: process”).
Intention: Assess and acknowledge consent/objections.
Tools: Acknowledge consent or the objection(s) like in Figure 3.37, “Explore: consent given? Acknowledging and celebrating a decision made/an objection.”).
It helps to say something like “We have consent, thank you everyone”, or “Ok, one objection. Let’s hear it.” Not having any acknowledgment can feel awkward.
We can do a debriefing round (“what was this process like? What does this decision mean to you?”), or celebrate! (This might depend on whether we have worked up to this decision for minutes or months.)
Complete when: A consent decision is made.
Figure 3.37. Explore: consent given? Acknowledging and celebrating a decision made/an objection.
 |
Publishing a decision is a vital step for transparency and effectiveness. Too often, groups fail to publish their decision. The decision has to be known and implemented for it to be effective.
Figure 3.38. The publication phase
 |
A policy is only valuable if people know about it! We make a plan on how we are going to get the word out. What needs to happen so people can follow the policy?
Intention: Making a plan of how to publish and implement the policy.
Tools: Gather ideas on publication proposals and find consent.
Complete when: There is consent to the publication plan.
We prepare our content (notification, spreadsheet, policy for logbook, tracking sheet) or any other physical object, so the policy can be carried out.
Intention: Creating materials to publish and implement.
Tools: What is necessary for this step depends on the nature of your work. Examples: paraphrasing the policy for publication, adding an example to explain, adding the rationale for the logbook, addressing barriers that may keep people from understanding and following your policy.
Complete when: Whatever is needed for publication/implementation is prepared.
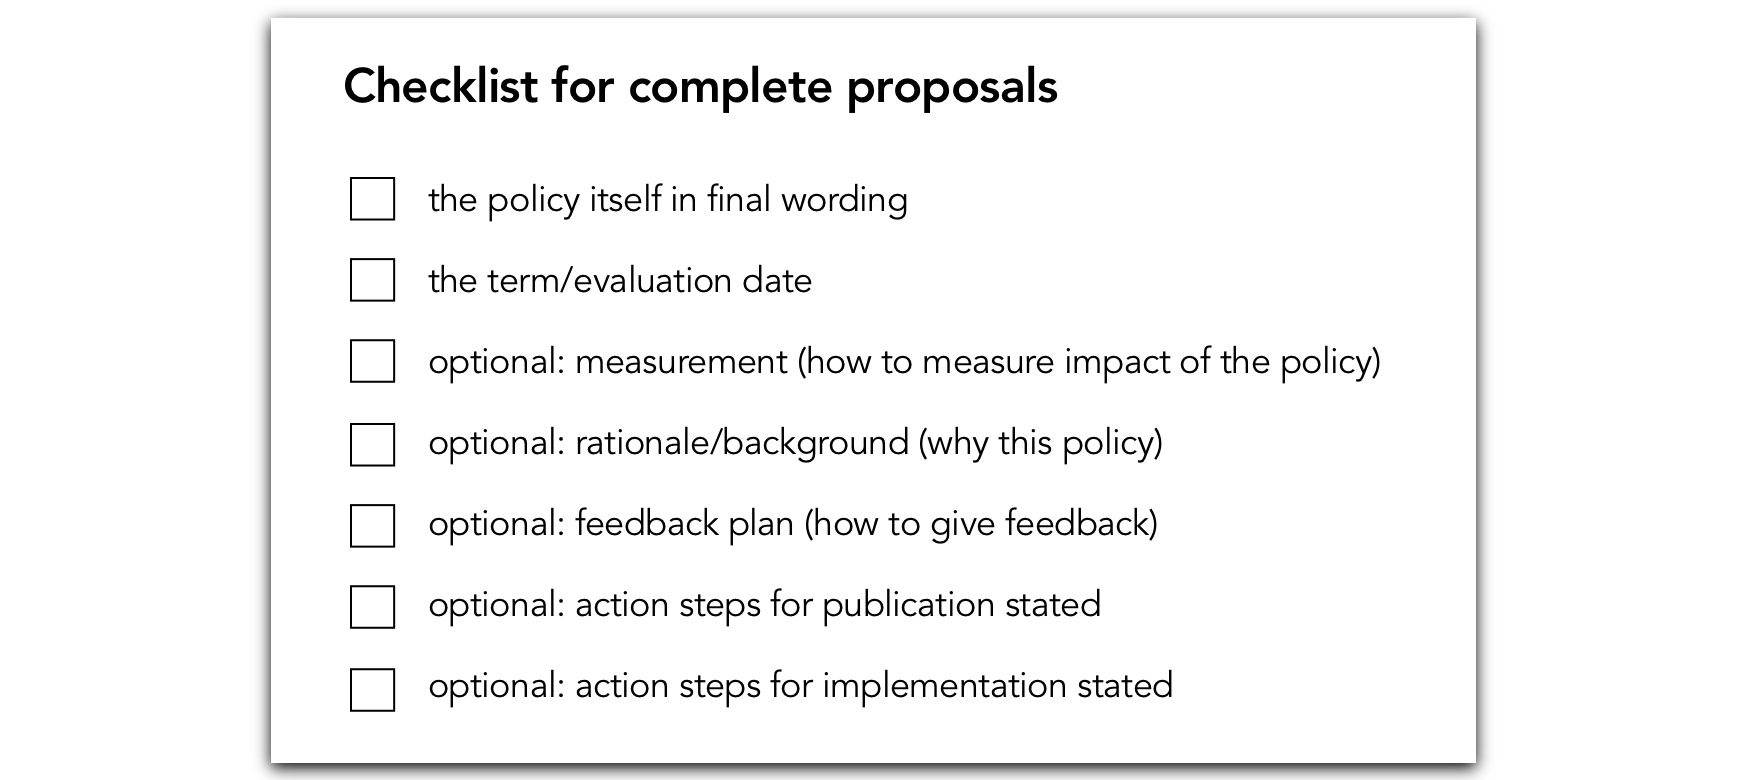
Example Figure 3.39, “Example of a complete policy” shows a complete policy that is ready to go into a logbook, and Figure 3.40, “Checklist for policy” provides a checklist.
Figure 3.39. Example of a complete policy
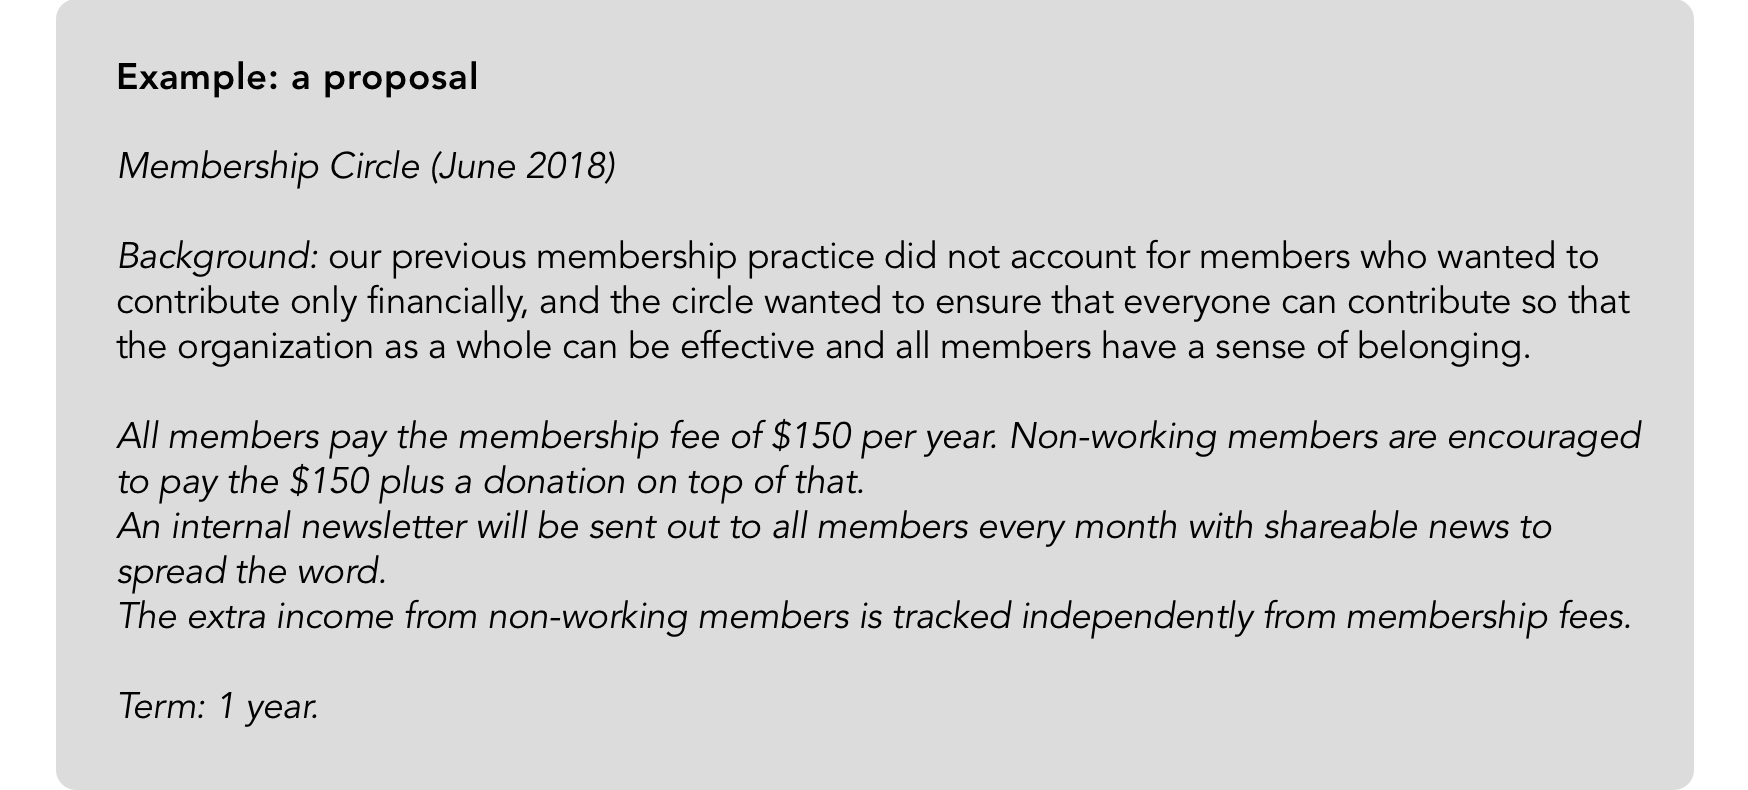 |
Figure 3.40. Checklist for policy
 |
Inform the right people in a suitable way of your new policy. This step is like turning the switch to “on”. The policy is now live.
Intention: Making your policy public.
Tools: Publish the minutes according to the publication plan.
For example, we might have a sign and put it up; we might have a piece of writing. It might be built into the IT system, your email signature…
The minutes need to be published in an accessible place/logbook.
We can add a rationale (some text of why the circle assumes the policy will help: a description of the trigger and the needs statement) that informed the policy.
For writing down policy, especially in a logbook, we want to make sure it is complete. The checklist in Figure 3.40, “Checklist for policy” on page Figure 3.40, “Checklist for policy” shows the information we might need.
We want to make sure to have a reminder for the term end date on a calendar, in whatever system we use to track future items. The term/review practice only works if we follow through!
Complete when: We have carried out our publication (and implementation) plan.
Imagine we make great policy with excellent process. We make a thorough decision and have a great plan for publishing the decision. Then the person who was supposed to write that laminated sign with the new policy on it drops the ball. The sign never gets written. The entire policy process will not have any effect. To prevent falling short, we have to make sure to complete. If all is well, it only takes a few seconds. If adjustment is needed we will be glad we addressed it.
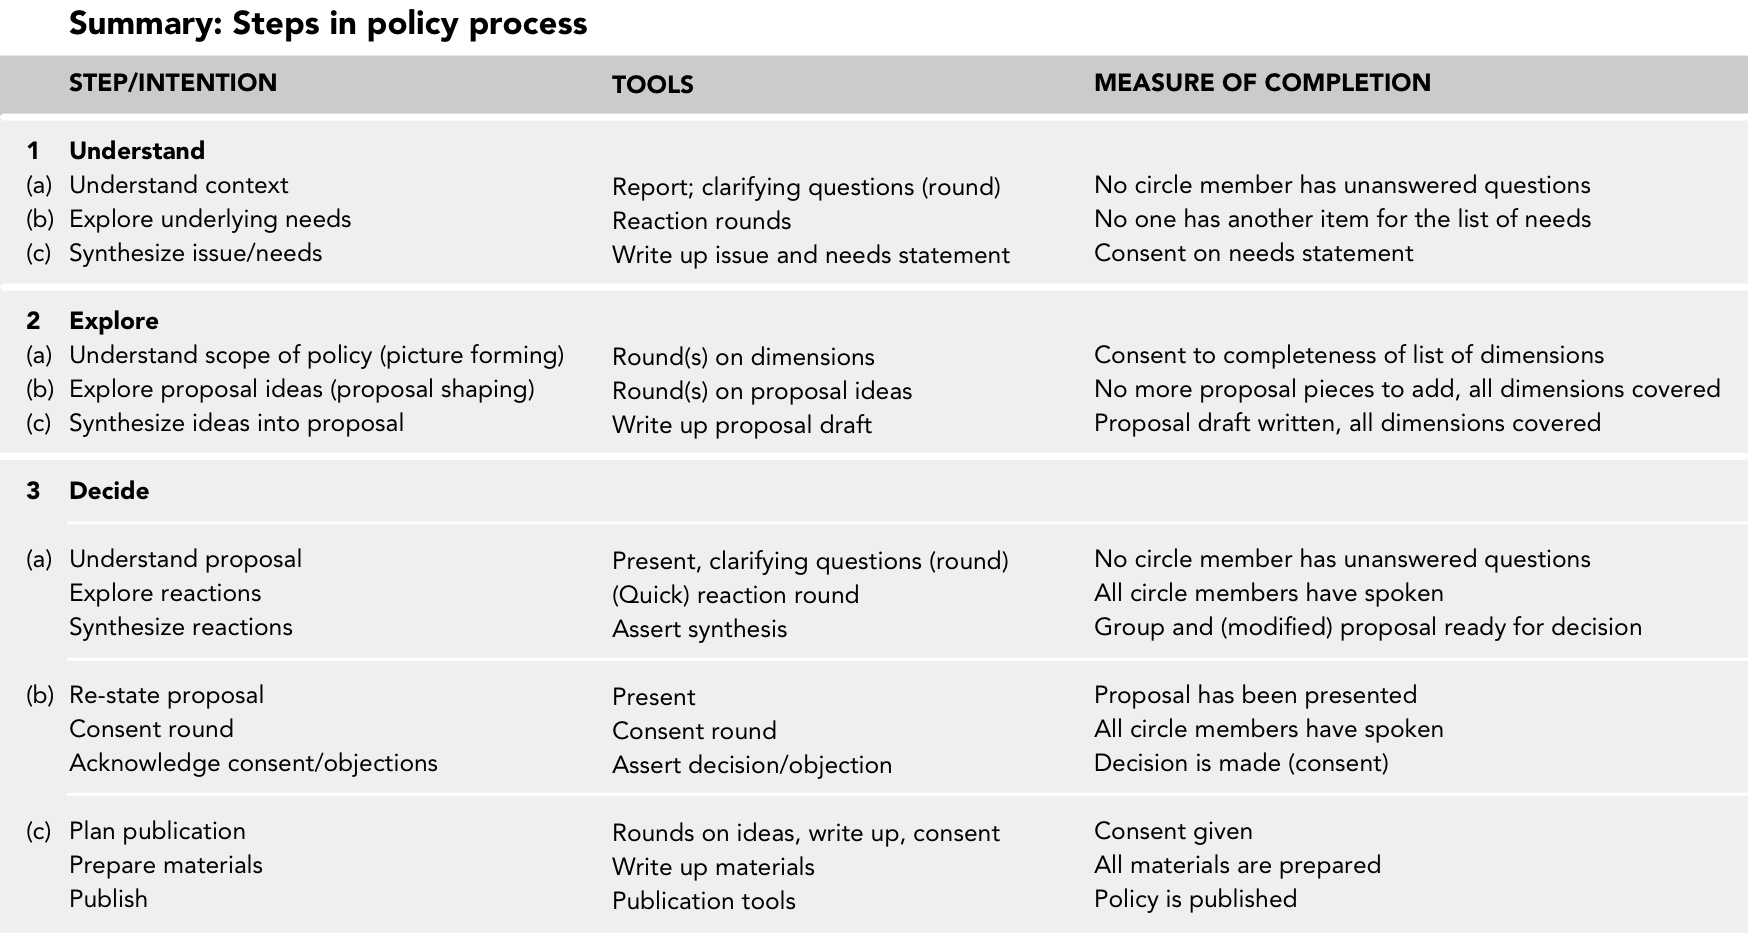
The table in Figure 3.41, “Understand–explore–decide with small steps, tools and measures” on page Figure 3.41, “Understand–explore–decide with small steps, tools and measures” gives an overview of a complete process.
Figure 3.41. Understand–explore–decide with small steps, tools and measures
 |
Skipping entire phases or steps will often result in stumbling, confusion, and frustration because we forget to listen when we rush through a process. What we call ‘‘emotional clean-up’’ -- restoring trust -- can be time-consuming, or even worse, never happen and wear on people and turn into social-emotional debt.
If we keep our focus on the intention and measure for every step, we will be able to move through a policy-making process. It might not always graceful or without temporary detours but we will arrive at our destination if we know where we want to get, and how we find out whether we’re there.